---
title: "Hyper-V High Availability with SafeKit: Install the hyperv.safe Module for Failover"
description: "SafeKit Video: Virtual Machine-Level Clustering with Hyper-V (5:15) In this video, discover how SafeKit implements high availability for Hyper-V without the complexity of a SAN. Learn to configure virtual machine replication across two nodes to ensure seamless failover for your critical virtualized workloads. Although this demonstration uses Hyper-V on Windows, the solution works identically with […]"
canonical: "https://safekit.eviden.com/quick-install/safekit-quick-installation-guide-with-hyper-v/"
topics: "High Availability Quick Installation Guide for Hyper-V, SafeKit High Availability Limitations, Overview of the SafeKit / Hyper-V solution, Installation of the SafeKit / Hyper-V solution on Windows (hyperv.safe), Step by step configuration of the SafeKit / Hyper-V solution, Demonstration of the SafeKit / Hyper-V solution, 🔍 SafeKit High Availability Navigation Hub"
category: "quick-install"
lang: "en"
---

<h1 id="hyper-v-high-availability-with-safekit-install-the-hypervsafe-module-for-failover">Hyper-V High Availability with SafeKit: Install the hyperv.safe Module for Failover</h1>
<h2 id="quick-guide">High Availability Quick Installation Guide for Hyper-V</h2>
<p>This guide explains how to set up a <strong>hyperv cluster</strong> for Hyper-V using SafeKit, ensuring automatic failover and synchronous replication without the need for shared storage.</p>
<p>For help, you can use <a href="/resources/safekit-support/">SafeKit AI 🤖</a>.</p>
<h3 id="1-overview">1. Overview</h3>
<ul>
<li><strong>Architecture:</strong> Uses a two-node system (Primary/Secondary).</li>
<li><strong>Data Protection:</strong> Implements real-time synchronous replication for <strong>zero data loss</strong> (RPO=0).</li>
</ul>
<h3 id="2-installation">2. Installation</h3>
<ul>
<li><strong>Software:</strong> Install the SafeKit engine on both servers.</li>
<li><strong>Module:</strong> Download the pre-configured <code>hyperv.safe</code> application module.</li>
</ul>
<h3 id="3-configuration">3. Configuration</h3>
<ul>
<li><strong>Web Console:</strong> Configure the specific folders containing the Hyper-V files.</li>
<li><strong>Monitoring:</strong> Start monitoring and protecting the Hyper-V application.</li>
</ul>
<h2 id="safekit-ha-limitations">SafeKit High Availability Limitations</h2>
<h3 id="why-a-replication-of-a-few-tera-bytes">Why a replication of a few Tera-bytes?</h3>
<p>Resynchronization time after a failure (<a href="/architectures/file-replication-byte-level-with-failover-hyperv-cluster/#safekit-hyperv-cluster">step 3</a>)</p>
<ul>
<li>1 Gb/s network ≈ 3 Hours for 1 Tera-bytes.</li>
<li>10 Gb/s network ≈ 1 Hour for 1 Tera-bytes or less depending on disk write performances.</li>
</ul>
<h4 id="alternative">Alternative</h4>
<ul>
<li>For a large volume of data, use <a href="/best-practises/san-vs-nas-shared-storage-for-a-failover-cluster/">external shared storage</a>.</li>
<li>More expensive, more complex.</li>
</ul>
<h3 id="why-a-replication-lt-1000000-files">Why a replication &lt; 1,000,000 files?</h3>
<ul>
<li>Resynchronization time performance after a failure (<a href="/architectures/file-replication-byte-level-with-failover-hyperv-cluster/#safekit-hyperv-cluster">step 3</a>).</li>
<li>Time to check each file between both nodes.</li>
</ul>
<h4 id="alternative-1">Alternative</h4>
<ul>
<li>Put the many files to replicate in a virtual hard disk / virtual machine.</li>
<li>Only the files representing the virtual hard disk / virtual machine will be replicated and resynchronized in this case.</li>
</ul>
<h3 id="why-a-failover--32-replicated-vms">Why a failover ≤ 32 replicated VMs?</h3>
<ul>
<li>Each VM runs in an independent hyperv module.</li>
<li>Maximum of 32 hyperv modules running on the same cluster.</li>
</ul>
<h4 id="alternative-2">Alternative</h4>
<ul>
<li>Use an external shared storage and another VM clustering solution.</li>
<li>More expensive, more complex.</li>
</ul>
<h3 id="why-a-lanvlan-network-between-remote-sites">Why a LAN/VLAN network between remote sites?</h3>
<ul>
<li>Automatic failover of the <a href="/best-practises/how-a-virtual-ip-address-works/">virtual IP address</a> with 2 nodes in the same subnet.</li>
<li>Good bandwidth for resynchronization (<a href="/architectures/file-replication-byte-level-with-failover-hyperv-cluster/#safekit-hyperv-cluster">step 3</a>) and good latency for <a href="/best-practises/synchronous-replication-vs-asynchronous-replication/">synchronous replication</a> (typically a round-trip of less than 2ms).</li>
</ul>
<h4 id="alternative-3">Alternative</h4>
<ul>
<li>Use a <a href="/best-practises/how-a-virtual-ip-address-works/">load balancer for the virtual IP address</a> if the 2 nodes are in 2 subnets (supported by SafeKit, especially in the cloud).</li>
<li>Use backup solutions with asynchronous replication for high latency network.</li>
</ul>
<h2 id="overview-of-the-safekit--hyper-v-solution">Overview of the SafeKit / Hyper-V solution</h2>
<p>The solution is described here: <strong><a href="/solutions/hyper-v-replication-automatic-failover-load-balancing/">Simple Hyper-V High Availability Without Shared Storage (SAN)</a></strong></p>
<h2 id="installation-of-the-safekit--hyper-v-solution-on-windows-hypervsafe">Installation of the SafeKit / Hyper-V solution on Windows (hyperv.safe)</h2>
<h3 id="prerequisites">Prerequisites</h3>
<ul>
<li>Hyper-V role installed on 2 Windows nodes (embedded for free in all Windows versions including Windows for PC).</li>
<li>Critical applications installed inside one or more virtual machines.</li>
<li>Maximum 32 virtual machines per Hyper-V host.</li>
<li>Total replicated data limited to a few terabytes — beyond this, resynchronization time becomes significant.</li>
<li>Minimum 1Gb/s interconnect between nodes (10Gb/s recommended for faster resynchronization).</li>
<li>IP failover requires both nodes on the same LAN or extended LAN (L2) — routed L3 networks not supported (except with <a href="/resources/safekit-user-guide-82/#Cloud">cloud load balancers</a>).</li>
</ul>
<h3 id="about-products-under-siemens-lms-licensing">About products under Siemens LMS licensing</h3>
<ul>
<li>To avoid the broken Siemens license on failover, the dongle containing the Siemens key can be put in a USB over IP device (like DIGI AnywhereUSB).</li>
<li>The dongle can also be put in an external PC with the <a href="https://sid.siemens.com/r/A6V10426066/16779394955__2.6_en-US_16791369099" target="_blank" rel="noopener">LMS license server</a> on the PC.</li>
<li>In recent versions of the Siemens licensing system, the license key can be put in the Trusted Platform Module of the VM.</li>
</ul>
<h3 id="package-installation-on-windows">Package installation on Windows</h3>
<ul>
<li>Download and install the free version of SafeKit on 2 Windows nodes.<br>
Note: the free version includes all SafeKit features. At the end of the trial, you can activate permanent license keys without uninstalling the package.</li>
<li>Upon completing the package installation, select <strong>Set console credentials and firewall rules now</strong> and configure a password for the <strong>admin</strong> user of the SafeKit console.<br>
<strong>Set the same password on all nodes.</strong></li>
<li>Exclude from antivirus scans <strong>C:/safekit/</strong> (the default installation directory) and <strong>all replicated folders</strong> that you are going to define.<br>
Antiviruses may face detection challenges with SafeKit due to its close integration with the OS, virtual IP mechanisms, real-time replication and restart of critical services.</li>
</ul>
<p><a href="/resources/safekit-free-trial/"> Download SafeKit (Windows) &gt; </a></p>
<h3 id="module-installation-on-windows">Module installation on Windows</h3>
<ul>
<li>Download the hyperv.safe module. The module is free. It contains the files userconfig.xml and the restart scripts.</li>
<li>Put <strong>hyperv.safe</strong> under <strong>C:/safekit/Application_Modules/generic</strong>.</li>
</ul>
<p><a class="btn-download" href="/wp-content/uploads/downloads_safekit/version-82/modules_windows/firebird.safe" download="hyperv.safe">⬇️ Download hyperv.safe (Windows) &gt;</a></p>
<h2 id="step-by-step-configuration-of-the-safekit--hyper-v-solution">Step by step configuration of the SafeKit / Hyper-V solution</h2>
<div class="callout callout-warning"><img src="/wp-content/uploads/2022/07/warning-small.png" alt="Warning"><span>Read carefully these items before starting: </span></div>
<ul>
<li>The Hyper-V configuration is presented with a virtual machine named <code>VM1</code>. Read carefully &ldquo;1. Prerequisites&rdquo; for the <strong>organization of VM1 files</strong> , otherwise recovery on the secondary node may fail with inconsistent data.</li>
<li>You will have to repeat this configuration for all VMs that you want to replicate and to restart.</li>
<li>The file system where the VM files replicated by SafeKit are stored must be NTFS; <strong>ReFS is not supported</strong>.</li>
<li>SafeKit supports replication of <strong>Hyper-V production checkpoints but not standard checkpoints</strong>. Do not use standard checkpoints, otherwise recovery on the secondary node may fail with inconsistent data.</li>
</ul>
<h3 id="prerequisite">1. Prerequisites</h3>
<p>For SafeKit replication, all VM1 virtual machine files (configuration file, virtual hard disk, etc.) must be stored in the same folder, even though this is not the default behavior of Hyper‑V (e.g., D:/Repli-Hyper-V/VM1, where VM1 is the name of the virtual machine).</p>
<p>If all the files of VM1 are not in the same folder, use Hyper-V manager:</p>
<ul>
<li>Export VM1 in a folder, for example in D:/Repli-Hyper-V</li>
<li>This export will create a folder D:/Repli-Hyper-V/VM1 containing all VM1 files</li>
<li>Remove VM1 from the inventory of Hyper-V manager</li>
<li>Import VM1, previously exported, into Hyper-V manager</li>
</ul>
<div class="callout callout-warning"><img src="/wp-content/uploads/2022/07/warning-small.png" alt="Warning"><span>Take a snapshot or your VM before starting the procedure.</span></div>
<div class="callout callout-warning"><img src="/wp-content/uploads/2022/07/warning-small.png" alt="Warning"><span>VM1 must only be created on a single node. The only thing to create on the other node is the VM1 directory (D:/Repli-Hyper-V/VM1).</span></div>
<div class="callout callout-warning"><img src="/wp-content/uploads/2022/07/warning-small.png" alt="Warning"><span>Make sure the virtual switch name(s) referenced by the virtual machine exist on both Hyper-V servers and corresponds to the same physical network.</span></div>
<div class="callout callout-warning"><img src="/wp-content/uploads/2022/07/warning-small.png" alt="Warning"><span>Hyper‑V module (hyperv.safe) failover may fail if VM migration prerequisites are not met. To detect compatibility issues between Hyper‑V nodes (hardware, network, configuration), see <a href="https://github.com/FR-LES-SAFEKIT-DEV/safekit-packages/releases/download/v8.2/SafeKit_8.2_Knowledge_Base.pdf">KB SK-0088 in this document</a>.</span></div>
<h3 id="2-launch-the-safekit-console">2. Launch the SafeKit console</h3>
<ul>
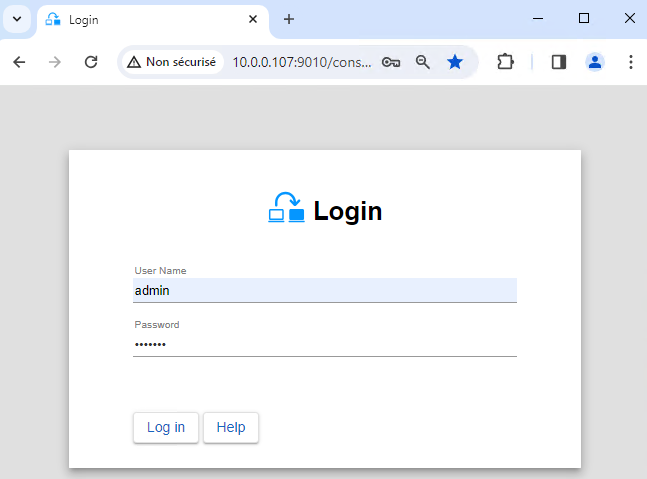
<li>Launch the web console in a browser on one cluster node by connecting to <code>http://localhost:9010</code>.</li>
<li>Enter <code>admin</code> as user name and the password defined during installation.</li>
</ul>
<p>You can also run the console in a browser on a workstation external to the cluster.</p>
<div class="callout callout-warning"><img src="/wp-content/uploads/2022/07/warning-small.png" alt="Warning"><span>The configuration of SafeKit is done on both nodes from a single browser.</span></div>
<div class="callout"><img src="/wp-content/uploads/2022/07/note.png" alt="Note"><span>To secure the web console, see <a href="/resources/safekit-user-guide-82/#https">11. Securing the SafeKit web service</a> in the User's Guide.</span></div>
<img src="/wp-content/uploads/2024/03/01-login-large.png" alt="Start the SafeKit web console to configure the Hyper-V cluster">
<h3 id="3-configure-node-addresses">3. Configure node addresses</h3>
<ul>
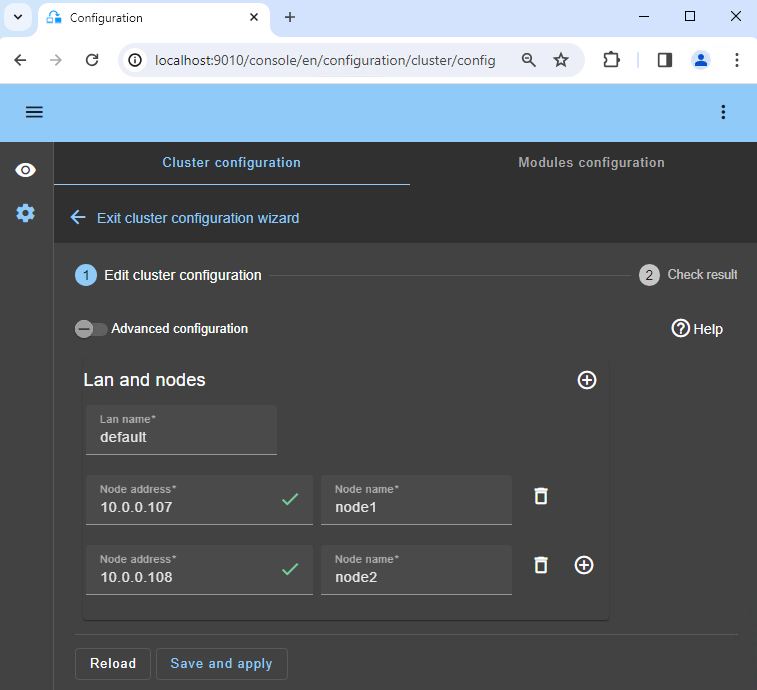
<li>Enter the node IP addresses, press the <code>Tab key</code> to check connectivity and fill node names. If either node1 or node2 has a red color, check connectivity of the browser to both nodes and check firewall on both nodes for <a href="/resources/safekit-user-guide-82/#Troubleshooting">troubleshooting</a>.</li>
<li>Then, click on <code>Save and apply</code> to save the configuration.</li>
<li>Check the <code>Success</code> ✅ message on both nodes.</li>
<li>If the configuration <code>Failure</code> ❌ occurs on one node, open the ▼ accordion for that node and review the messages. Note that you can use the SafeKit AI 🤖 for assistance.</li>
</ul>
<div class="callout"><img src="/wp-content/uploads/2022/07/note.png" alt="Note"><span>If you want, you can add a new `LAN and nodes` ( first ➕) to create a second heartbeat and a dedicated replication network.</span></div>
<div class="callout"><img src="/wp-content/uploads/2022/07/note.png" alt="Note"><span>If you click on `Advanced configuration`, the `cluster.xml` file is displayed. This file is automatically populated by the console and deployed on the nodes.</span></div>
<img src="/wp-content/uploads/2024/03/02-cluster-edit.png" alt="Enter the nodes of the Hyper-V cluster">
<h3 id="4-select-a-module">4. Select a module</h3>
<ul>
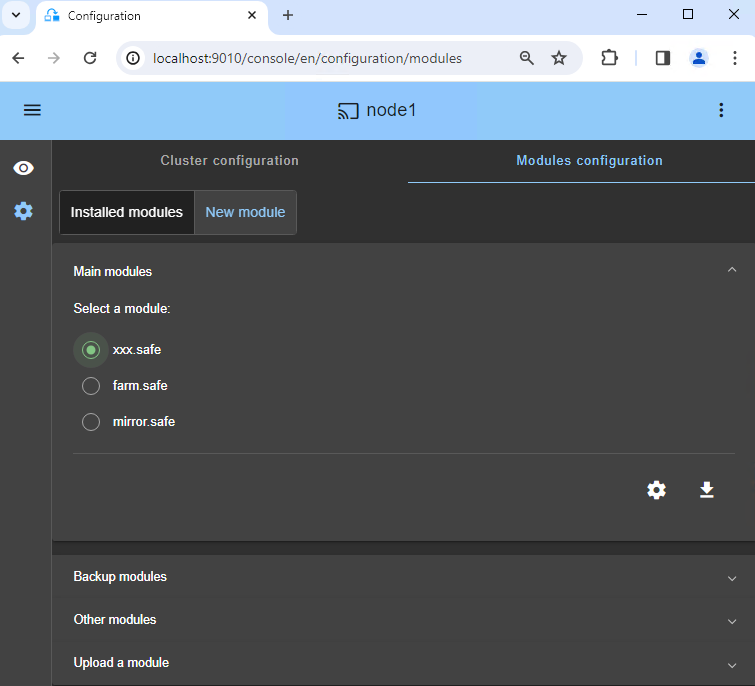
<li>In <code>New module</code>, click on the <code>hyperv.safe</code> module.</li>
</ul>
<div class="callout"><img src="/wp-content/uploads/2022/07/note.png" alt="Note"><span>In the blue banner at the top, 🛜 `node1` represents the console connection node. This node relays requests to `node2` when required.</span></div>
<div class="callout"><img src="/wp-content/uploads/2022/07/note.png" alt="Note"><span>The console looks for `xxx.safe` in the `Application_Modules/generic/` directory on the connection node (`node1`) if you placed a module there during installation.</span></div>
<img src="/wp-content/uploads/2024/03/04-module-new.png" alt="Choose the module for Hyper-V">
<h3 id="5-configure-the-module">5. Configure the module</h3>
<ul>
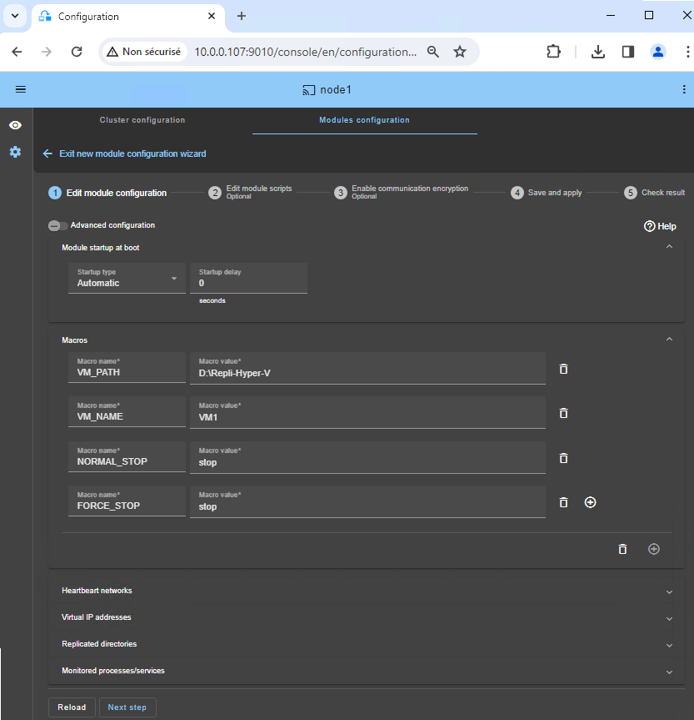
<li>Choose an <code>Automatic</code> start of the module at boot without delay.</li>
<li>Normally, you have a single <code>Heartbeat</code> network on which the replication is made. But, you can define a private network if necessary (by adding a LAN at step 3).</li>
<li>Put in <code>VM_PATH</code>, the root path of the replicated directory (D:/Repli-Hyper-V).</li>
<li>Enter in <code>VM_NAME</code>, the name of the virtual machine (VM1).</li>
</ul>
<p>We assume that all VM1 files are in D:/Repli-Hyper-V/VM1 (see <a href="#prerequisite">prerequisites</a>). This directory will be replicated in real-time by SafeKit. Do not perform partial replication, as failover will not work.</p>
<p>The <code>NORMAL_STOP</code> and <code>FORCE_STOP</code> values can be &ldquo;<code>stop</code>&rdquo;, &ldquo;<code>save</code>&rdquo; or &ldquo;<code>off</code>&rdquo;:</p>
<ul>
<li>&ldquo;<code>stop</code>&rdquo; shutdowns the VM when the module is stopped.</li>
<li>&ldquo;<code>save</code>&rdquo; saves the current state of the VM (suspend) when the module is stopped.</li>
<li>&ldquo;<code>off</code>&rdquo; turns off the VM (power off) when the module is stopped.</li>
</ul>
<p>&ldquo;<code>stop</code>&rdquo; is recommended because it causes the shutdown then the reboot of the VM when the module is stopped and restarted. Thus, if the application inside the VM fails, it is restarted.</p>
<p>This will be the case, for example, when switching between primary and secondary roles.</p>
<div class="callout"><img src="/wp-content/uploads/2022/07/note.png" alt="Note"><span>You do not need to configure a virtual IP address. VM1 will be rebooted on the secondary Hyper-V with its physical IP address, and this IP address will be rerouted.</span></div>
<div class="callout"><img src="/wp-content/uploads/2022/07/note.png" alt="Note"><span>When you apply the SafeKit configuration, the `Automatic Start Action` of the virtual machine is set to `Nothing` in Hyper-V. This ensures that the VM does not start automatically when the Hyper‑V host starts, but is instead started only when the module itself is started.</span></div>
<img src="/wp-content/uploads/2024/03/19-module-hyperv-edit-config-1.png" alt="Enter the Hyper-V parameters">
<h3 id="vm-checker">6. Custom checker to detect VM malfunction</h3>
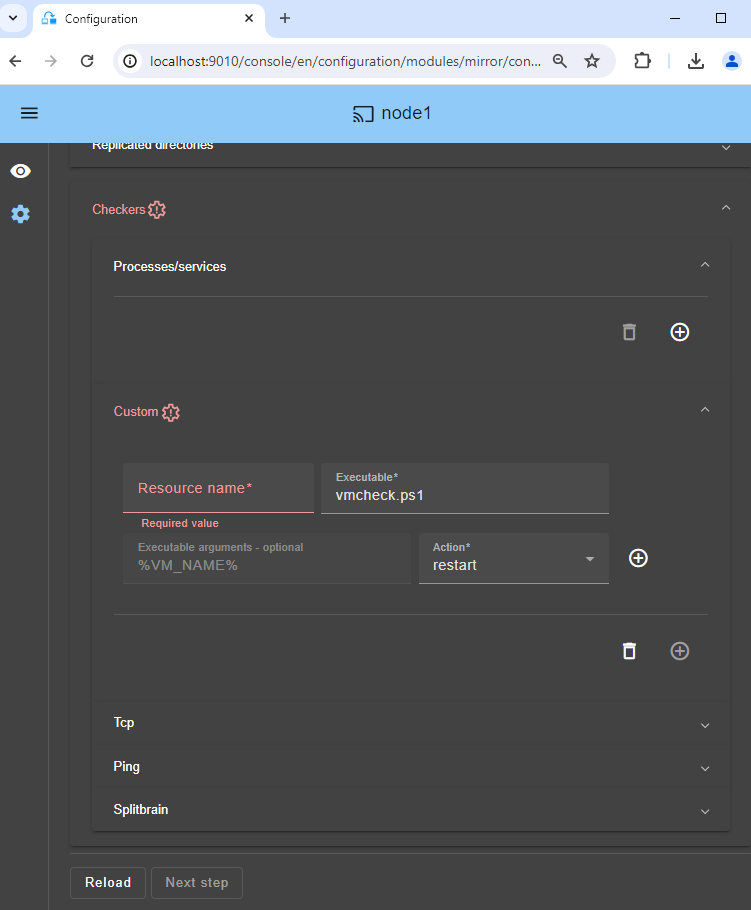
<p>The custom checker sends heartbeat messages from the host to the VM at regular intervals. It is then the job of the Hyper-V Heartbeat Service installed in the VM to send a response to each of these heartbeat messages.</p>
<p>If the Hyper-V Heartbeat Service does not respond to the message (VM locked up, crashed or ceased to function), then the custom checker executes an action to restart the VM on the same Hyper-V node or on the other.</p>
<ul>
<li>Click on <code>Checkers / Custom</code> (see image).</li>
<li>Just set a name of your choice in <code>Resource name</code> (example VM1). <code>Resource name</code> identifies the virtual machine with a resource name in SafeKit: <code>custom.VM1</code>.</li>
<li>With <code>restart</code> in <code>Action</code>, the VM is restarted on the same Hyper-V node. After 3 unsuccessful restarts in 24 hours, the SafeKit hyperv module stops on the primary node and there is a failover of the VM on the secondary node.</li>
<li>If you set <code>stopstart</code> in <code>Action</code>, there is a direct failover on the other Hyper-V node as soon as the VM does not respond to heartbeats.</li>
</ul>
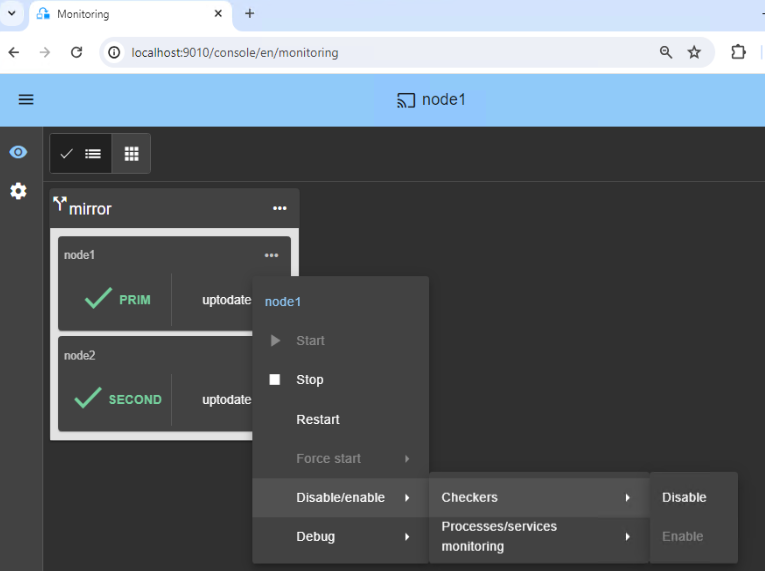
<div class="callout"><img src="/wp-content/uploads/2022/07/note.png" alt="Note"><span>For maintenance, if you want to stop the virtual machine, the custom checker will restart it automatically. To avoid that, you can temporarly <a href="/wp-content/uploads/2024/04/safekit-disable-checkers.png">suspend the checker 🖼️</a>. Or you can remove it by deleting the configuration line in the console.</span></div>
<p>It’s the same when you want to restore a checkpoint. Hyper-V will stop the VM to perform the operation, and the VM checker may react negatively by automatically restarting the VM. To avoid this, <a href="/wp-content/uploads/2024/04/safekit-disable-checkers.png">suspend the checker 🖼️</a> before proceeding with the operation.</p>
<img src="/wp-content/uploads/2024/04/safekit-custom-checker-hyperv.png" alt="Enter the Hyper-V custom checker parameters">
<h3 id="7-edit-scripts-optional">7. Edit scripts (optional)</h3>
<ul>
<li>Do not edit scripts.</li>
</ul>
<h3 id="8-communication-encryption-optional">8. Communication encryption (optional)</h3>
<ul>
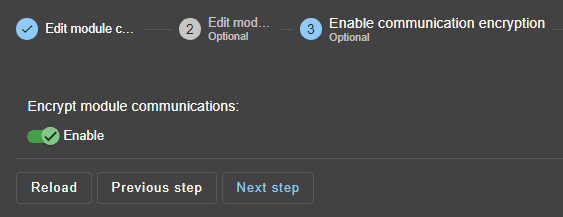
<li>Keep encryption of communication between nodes.</li>
</ul>
<img src="/wp-content/uploads/2024/03/07-module-encryption.png" alt="Communication encryption of the Hyper-V module">
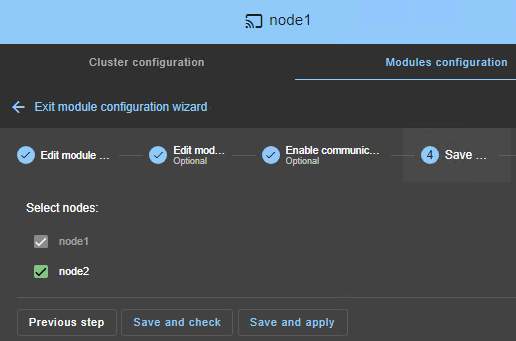
<h3 id="9-save-and-apply">9. Save and apply</h3>
<ul>
<li><code>Save and apply</code> the configuration and scripts on both nodes.</li>
</ul>
<img src="/wp-content/uploads/2024/03/08-module-save.png" alt="Save and apply the Hyper-V module configuration">
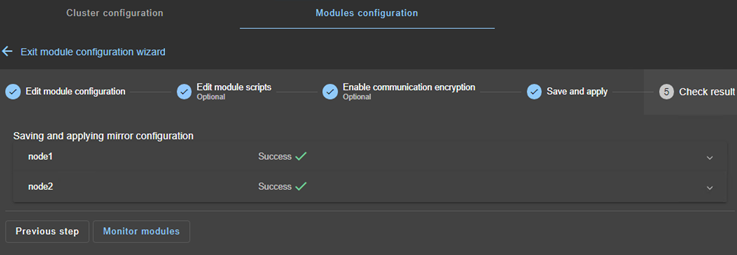
<h3 id="10-verify-successful-configuration">10. Verify successful configuration</h3>
<ul>
<li>Check the <code>Success</code> ✅ message on both nodes and click on <code>Monitor modules</code>.</li>
<li>If the configuration <code>Failure</code> ❌ occurs on one node, open the ▼ accordion for that node and review the messages. Note that you can use the SafeKit AI 🤖 for assistance.</li>
</ul>
<img src="/wp-content/uploads/2024/03/09-module-save-check.png" alt="Check the Hyper-V module configuration success">
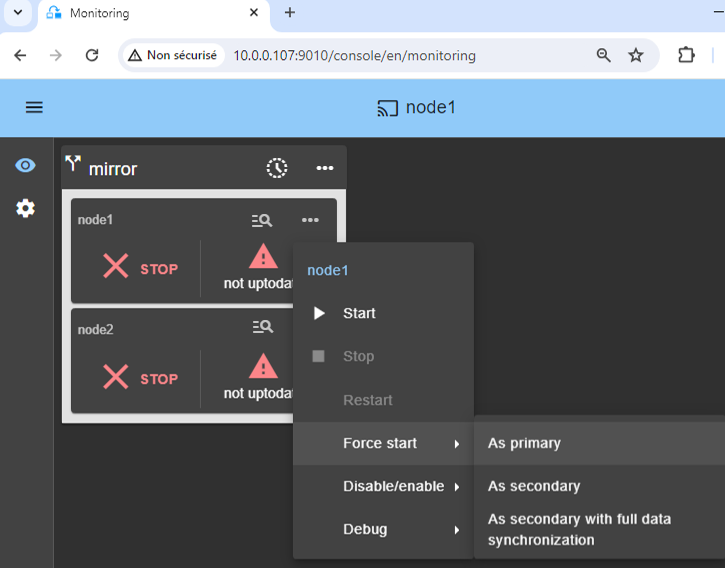
<h3 id="11-start-the-node-with-up-to-date-data">11. Start the node with up-to-date data</h3>
<ul>
<li>If node 1 has the up-to-date replicated directory for <code>VM1/</code>, select it and ⋯ <code>Force start</code> ▶ <code>As primary</code>.</li>
</ul>
<p>When node 2 will be started, all data will be copied from node 1 to node 2.</p>
<div class="callout callout-warning"><img src="/wp-content/uploads/2022/07/warning-small.png" alt="Warning"><span>If you make the wrong choice, you run the risk of synchronizing outdated data on both nodes.</span></div>
<div class="callout callout-warning"><img src="/wp-content/uploads/2022/07/warning-small.png" alt="Warning"><span>It is also assumed that `VM1` is stopped on node 1 so that SafeKit installs the replication mechanisms and then starts `VM1` in the `start_prim` script.</span></div>
<div class="callout callout-warning"><img src="/wp-content/uploads/2022/07/warning-small.png" alt="Warning"><span>Use `Start` for subsequent starts: SafeKit retains the most up-to-date server. Starting `As primary` is a special start-up the first time or during exceptional operations.</span></div>
<img src="/wp-content/uploads/2024/03/10-monitoring-mirror-stop-stop-prim.png" alt="Start as primary the Hyper-V node with the up-to-date data">
<h3 id="12-wait-for-the-transition-to-alone-green">12. Wait for the transition to ALONE (green)</h3>
<ul>
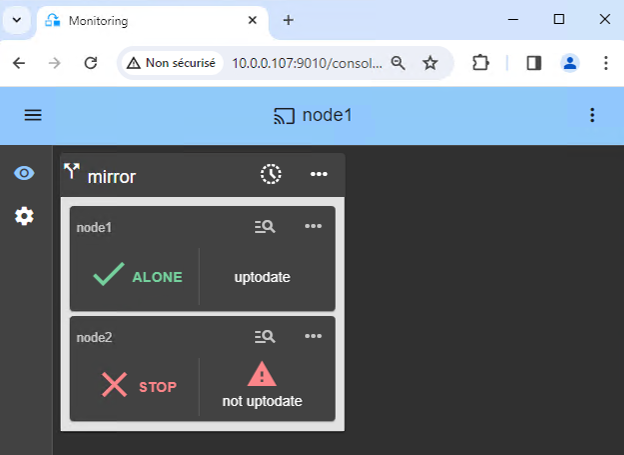
<li>Node 1 should reach the ALONE (green) state, which means that the <code>start_prim</code> script has been executed on node 1.</li>
</ul>
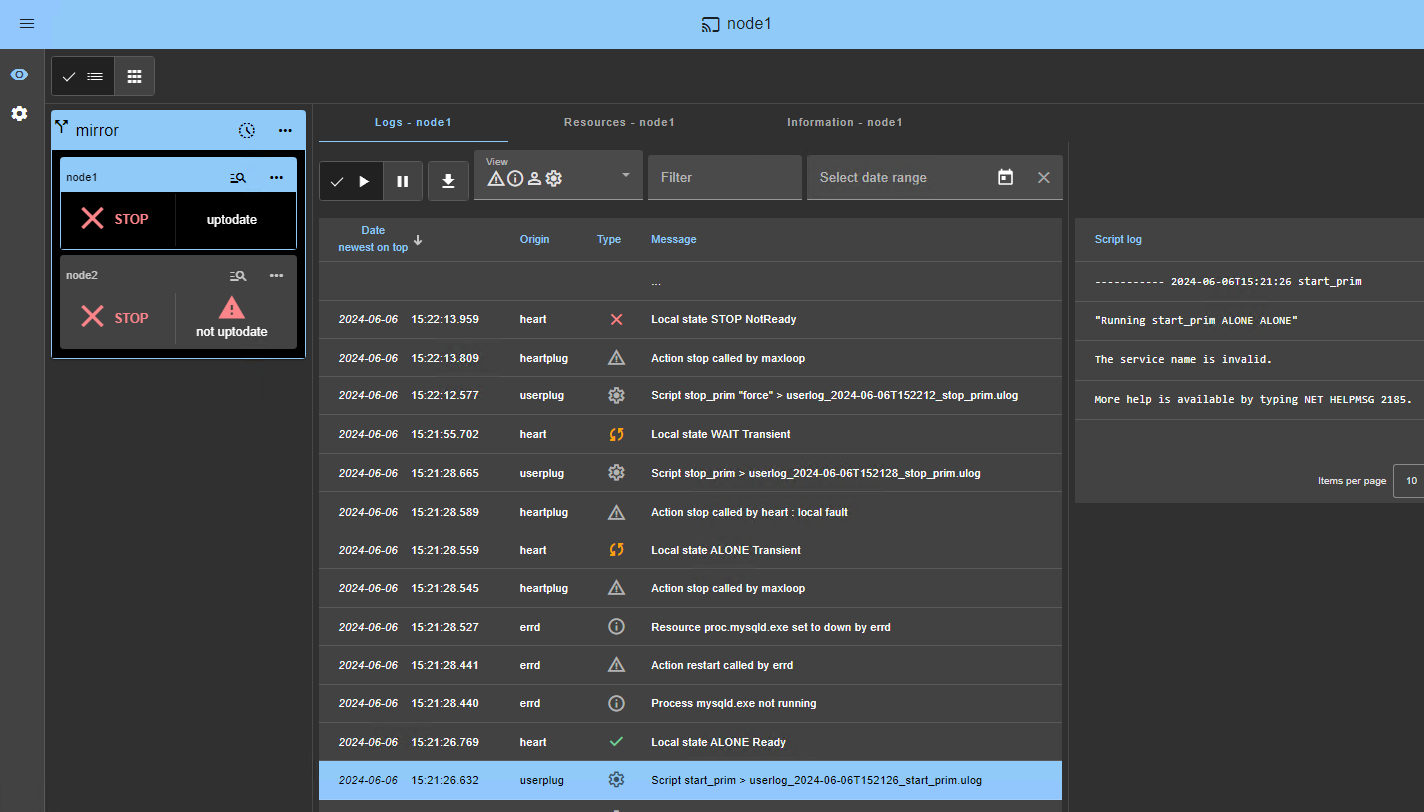
<div class="callout callout-warning"><img src="/wp-content/uploads/2022/07/warning-small.png" alt="Warning"><span>If ALONE (green) is not reached or if VM1 is not started, analyze why with the <a href="/wp-content/uploads/2024/03/24-module-log-script.png">module log 🖼️</a> of node 1.</span></div>
<ul>
<li>Click the 🔍 <strong>log</strong> icon of <code>node1</code> to open the module log and look for error messages such as a checker detecting an error and stopping the module.</li>
<li>Click on <code>start_prim</code> in the log: output messages of the script are displayed on the right and errors can be detected such as VM1 incorrectly started.</li>
<li>Use the SafeKit AI 🤖 for assistance with log messages.</li>
</ul>
<div class="callout callout-warning"><img src="/wp-content/uploads/2022/07/warning-small.png" alt="Warning"><span>If the cluster is in `WAIT (red) not uptodate, STOP (red) not uptodate` state, stop the WAIT node and <a href="/wp-content/uploads/2024/03/10-monitoring-mirror-stop-stop-prim.png">force its start as primary 🖼️</a>.</span></div>
<img src="/wp-content/uploads/2024/03/12-monitoring-alone-stop.png" alt="The first Hyper-V node starts as primary and becomes ALONE">
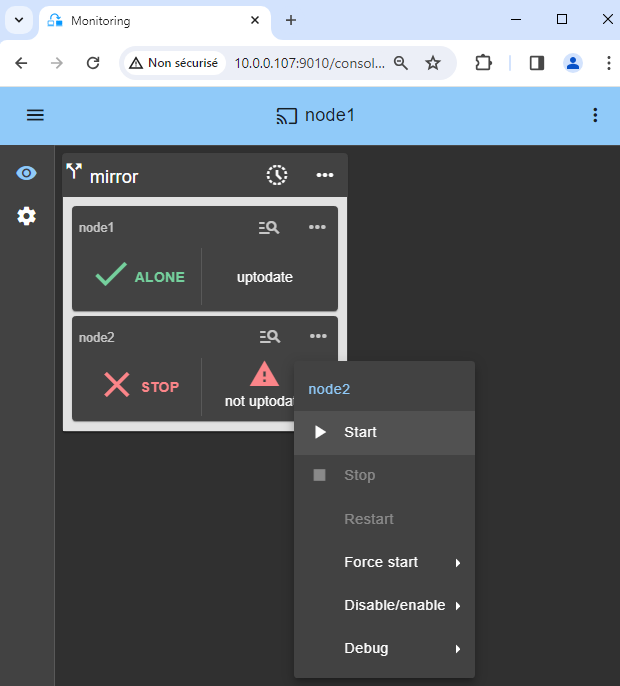
<h3 id="13-start-node-2">13. Start node 2</h3>
<ul>
<li>⋯ <code>Start</code> node 2 with its contextual menu.</li>
<li>Wait for the SECOND (green) state.</li>
</ul>
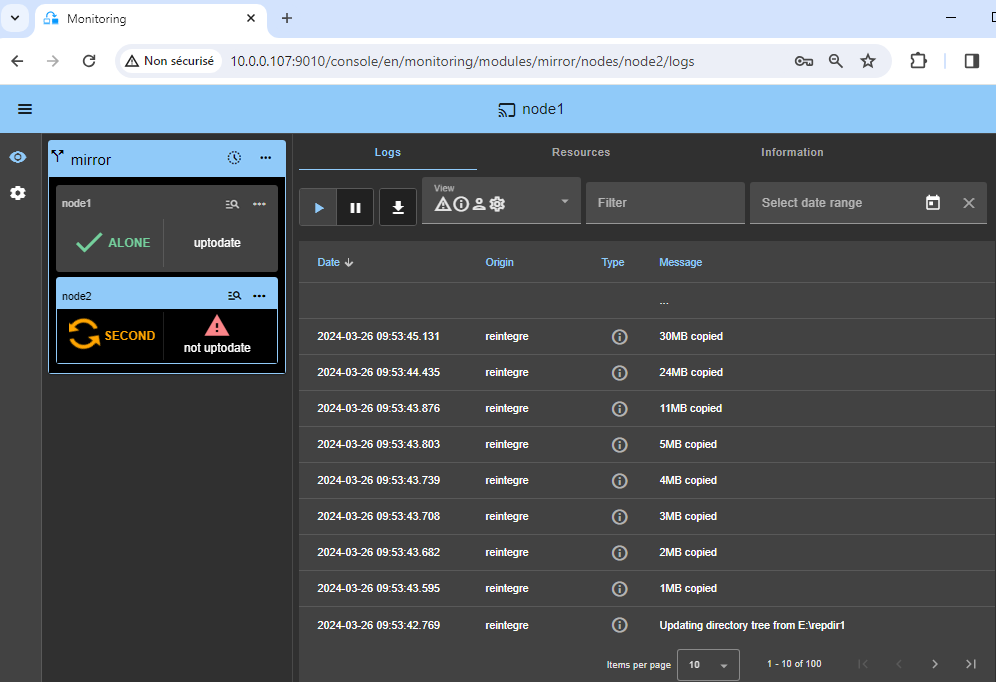
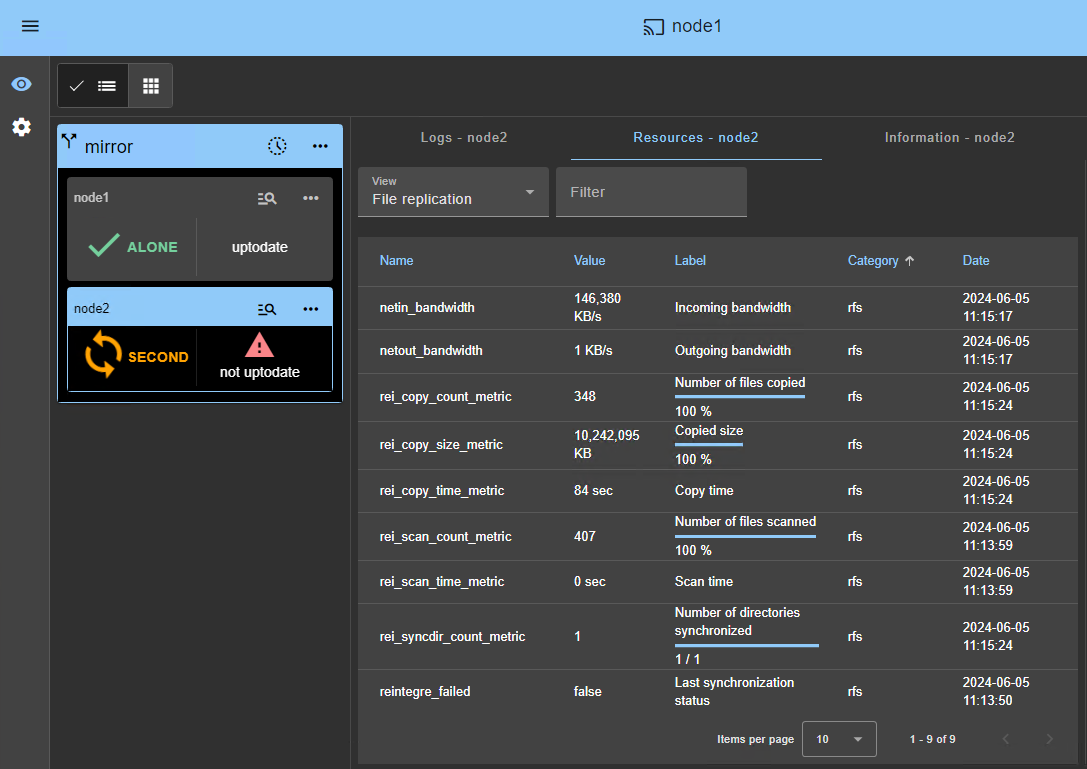
<div class="callout"><img src="/wp-content/uploads/2022/07/note.png" alt="Note"><span>Node 2 stays in the SECOND (orange) state while resynchronizing the replicated directories (copy from node 1 to node 2).</span></div>
<p>This may take a while depending on the size of files to resynchronize in replicated directories and the network bandwidth.</p>
<p>To see the progress of the copy, see the <a href="/wp-content/uploads/2024/03/27-module-log-reintegration.png">module log 🖼️</a> and the <a href="/wp-content/uploads/2024/03/26-replication-resources-reintegration.png">replication resources 🖼️</a> of node 2. Use the SafeKit AI 🤖 for assistance with log messages.</p>
<div class="callout"><img src="/wp-content/uploads/2022/07/note.png" alt="Note"><span>When using Hyper-V differencing disks, only the differencing disk needs resynchronization after the initial sync, saving time for large virtual hard disks.</span></div>
<img src="/wp-content/uploads/2024/03/13-monitoring-alone-stop-start.png" alt="Start the Hyper-V node 2">
<h3 id="14-verify-that-the-cluster-is-operational">14. Verify that the cluster is operational</h3>
<ul>
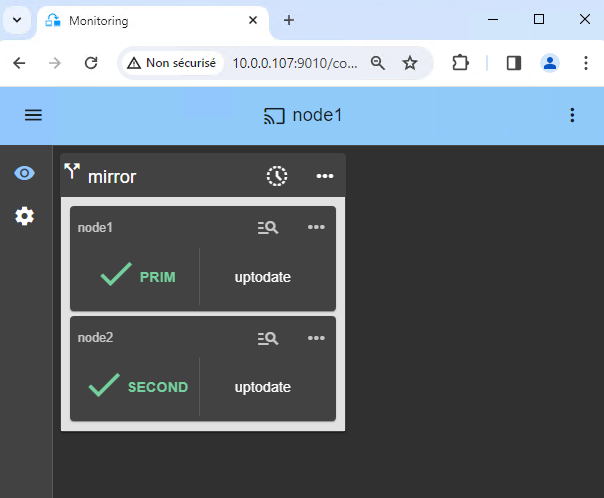
<li>Check that the cluster is green/green with <code>VM1</code> running on the PRIM node and not running on the SECOND node.</li>
</ul>
<p>Only changes inside files are replicated in real time in this state.</p>
<img src="/wp-content/uploads/2024/03/14-monitoring-prim-second.png" alt="The Hyper-V node 2 is SECOND (green)">
<h3 id="15-testing">15. Testing</h3>
<ul>
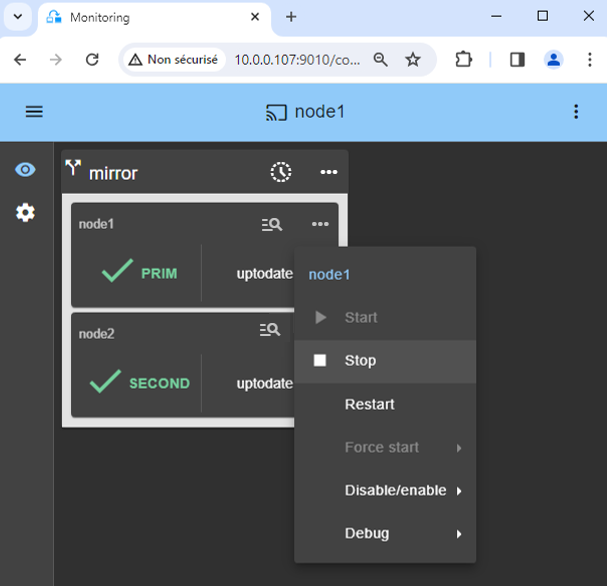
<li>Stop the PRIM node by scrolling down its contextual menu and clicking <code>Stop</code>.</li>
<li>Verify that there is a failover on the SECOND node which should become ALONE (green).</li>
<li>Check with Hyper-V manager that <code>VM1</code> is running on node 2.</li>
</ul>
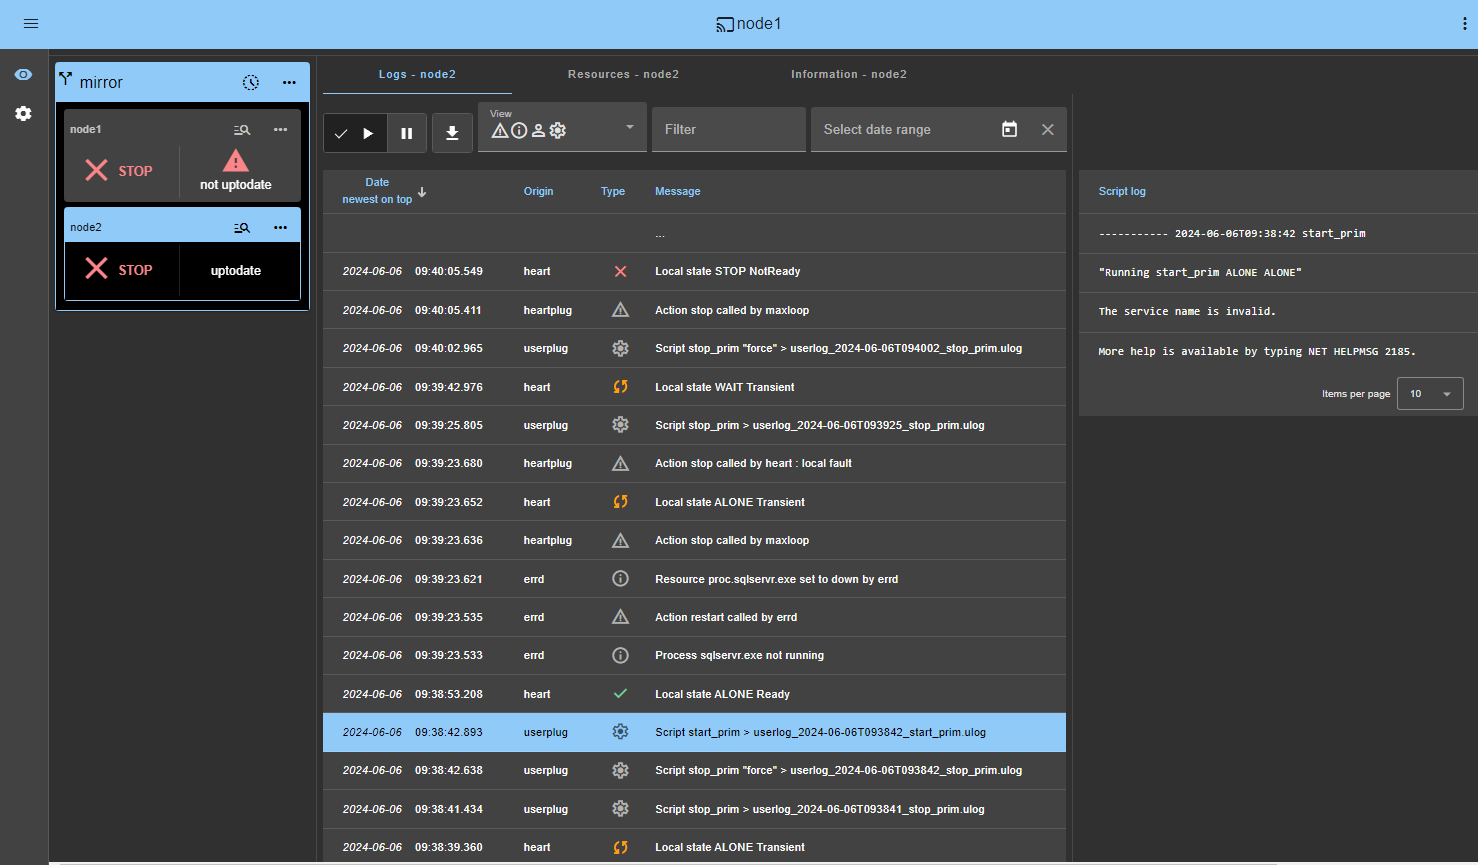
<div class="callout callout-warning"><img src="/wp-content/uploads/2022/07/warning-small.png" alt="Warning"><span>If ALONE (green) is not reached on node2 or if VM1 is not started, analyze why with the <a href="/wp-content/uploads/2024/03/38-module-log-script-second.png">module log 🖼️</a> of node 2.</span></div>
<ul>
<li>Click the 🔍 <strong>log</strong> icon of <code>node2</code> to open the module log and look for error messages such as a checker detecting an error and stopping the module.</li>
<li>Click on <code>start_prim</code> in the log: output messages of the script are displayed on the right and errors can be detected such as VM1 incorrectly started.</li>
<li>Use the SafeKit AI 🤖 for assistance with log messages.</li>
</ul>
<div class="callout callout-warning"><img src="/wp-content/uploads/2022/07/warning-small.png" alt="Warning"><span>As the `start_prim` script imports the virtual machine on node 2, the failover can fail because of <a href="https://github.com/FR-LES-SAFEKIT-DEV/safekit-packages/releases/download/v8.2/SafeKit_8.2_Knowledge_Base.pdf">Hyper-V settings (see KB SK-0088 in this document)</a>.</span></div>
<div class="callout callout-warning"><img src="/wp-content/uploads/2022/07/warning-small.png" alt="Warning"><span>If everything is okay, initiate a start on node1, which will resynchronize the replicated directories from node2.</span></div>
<p>If things go wrong, stop node2 and <a href="/wp-content/uploads/2024/03/10-monitoring-mirror-stop-stop-prim.png">force the start as primary 🖼️</a> of node1, which will restart with its locally healthy data at the time of the stop.</p>
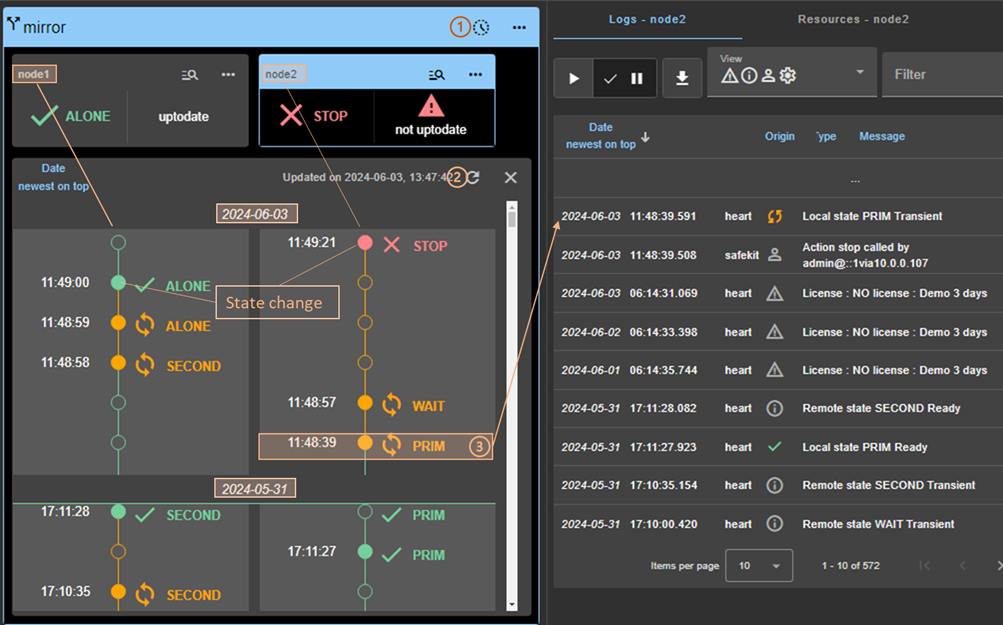
<div class="callout"><img src="/wp-content/uploads/2022/07/note.png" alt="Note"><span>Note that you have a 🕒 **<a href="/wp-content/uploads/2026/05/safekit-console-timeline.png">timeline 🖼️</a>** that can be helpful to understand what happens in the cluster.</span></div>
<img src="/wp-content/uploads/2024/03/16-monitoring-prim-second-stop.png" alt="Stop the Hyper-V module on the PRIM server">
<h3 id="16-if-necessary-configure-a-splitbrain-checker">16. If necessary, configure a splitbrain checker</h3>
<ul>
<li>See <a href="/best-practises/power-outage-and-network-isolation-in-a-cluster/">What are the different scenarios in case of network isolation in a cluster?</a> to know if you need to configure a splitbrain checker.</li>
<li>Go to the module configuration and click on <code>Checkers / Splitbrain</code> (see image) to edit the splitbrain parameters.</li>
<li><code>Save and apply</code> the new configuration to redeploy it on both nodes (module must be stopped on both nodes to save and apply).</li>
</ul>
<p><strong>Parameters</strong> :</p>
<ul>
<li><code>Resource name</code> identifies the witness with a resource name: <code>splitbrain.witness</code>. You can change this value to identify the witness.</li>
<li><code>Witness address</code> is the argument for a ping when a node goes from PRIM to ALONE or from SECOND to ALONE. Change this value with the IP of the witness (a robust element, typically a router).</li>
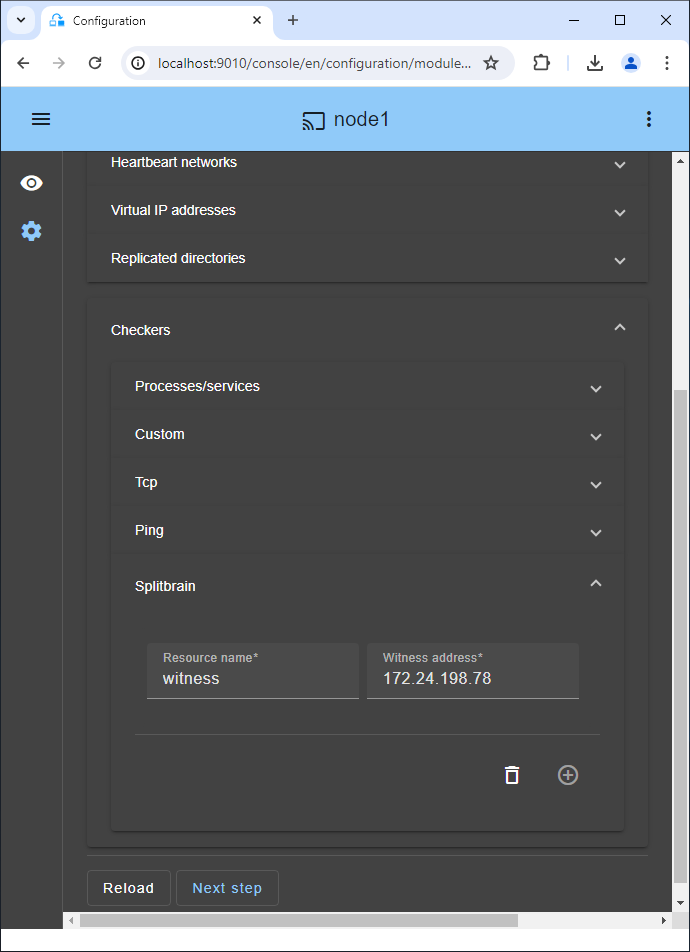
<li>Note: you can set several IPs separated by white spaces. Pay attention that the IP addresses must be accessible from one node but not from the other in the event of network isolation.</li>
</ul>
<img src="/wp-content/uploads/2024/04/safekit-split-brain-checker.png" alt="Enter the Hyper-V splitbrain parameters">
<h3 id="17-automatic-restart-if-a-critical-service-fails-inside-the-vm">17. Automatic restart if a critical service fails inside the VM</h3>
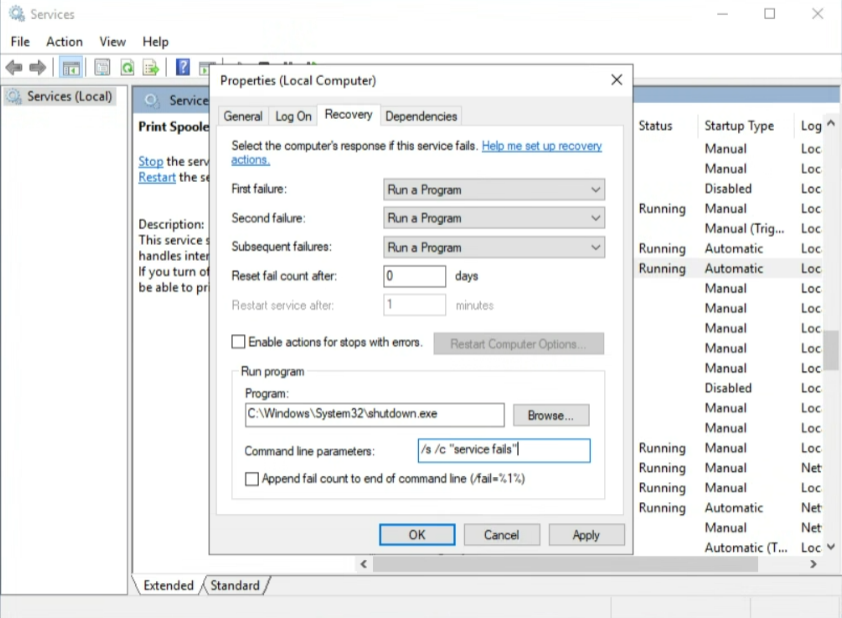
<p>If you want an automatic restart or failover when a critical service inside the VM fails, you can configure the Recovery properties of the service (see image).</p>
<p>First you must configure the <a href="#vm-checker">VM custom checker</a> previously described.</p>
<p>And then in Microsoft Service Manager inside the VM, select your critical service and in the recovery property of the service, you just have to configure shutdown of the VM when the critical service fails.</p>
<p>For that, in the Recovery options of your critical service, choose &ldquo;<strong>Run a Program</strong> &quot; on failures and in Run program options, set&rdquo;<strong>C:/Windows/System32/shutdown.exe</strong> &quot; and in &ldquo;Command line parameters&rdquo;, set <strong>/s /c &ldquo;service fails&rdquo;</strong>.</p>
<p>Of course, you can implement more subtle recovery with your own scripts. But just be aware that shutting down the VM will enable the custom checker in the host. The custom checker will detect that the Hyper-V heartbeat is no more responding and will restart the VM on the same Hyper-V server or will make a failover on the other Hyper-V server (depending on its configuration).</p>
<p>To test the feature, use Task Manager and kill the process (End task) associated to the critical service. A clean stop of the service through Service Manager or the &ldquo;net stop&rdquo; command does not trigger the recovery action inside Windows Service Manager.</p>
<img src="/wp-content/uploads/2023/11/hyperv-critical-service.png" alt="Hyper-V VM critical services failover of Hyper-V module">
<h3 id="18-support">18. Support</h3>
<ul>
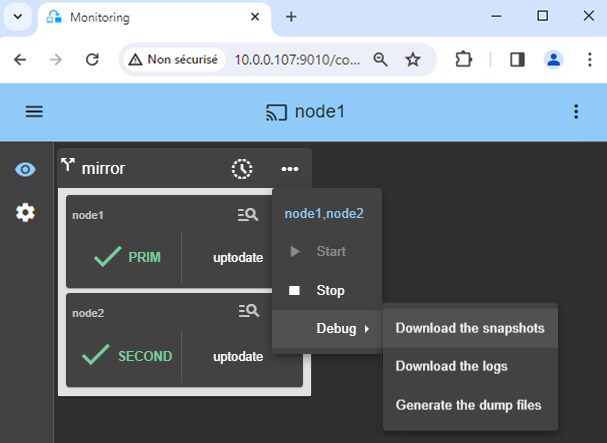
<li>For getting support, take 2 SafeKit <code>Snapshots</code> (2 .zip files), one for each node.</li>
</ul>
<div class="callout"><img src="/wp-content/uploads/2022/07/note.png" alt="Note"><span><a href="/resources/safekit-support/">More information on the support here</a>.</span></div>
<img src="/wp-content/uploads/2024/03/30-snapshots-mirror.png" alt="Take the Hyper-V snaphots for support">
<h2 id="demonstration-of-the-safekit--hyper-v-solution">Demonstration of the SafeKit / Hyper-V solution</h2>
<h3 id="demo-hyperv">SafeKit Video: Virtual Machine-Level Clustering with Hyper-V (5:15)</h3>
<p>In this video, discover how SafeKit implements <strong>high availability for Hyper-V</strong> without the complexity of a SAN. Learn to configure <strong>virtual machine replication</strong> across two nodes to ensure seamless failover for your critical virtualized workloads. Although this demonstration uses Hyper-V on Windows, the solution works identically with KVM on Linux.</p>
<h3 id="chapters">Chapters</h3>
<ol>
<li><a href="https://www.youtube.com/watch?v=H18s_-_CpmU&amp;amp;t=0s" target="_blank" rel="noopener">Architecture overview: 2 Hyper-V nodes and 2 virtual machines</a> (0:49)</li>
<li><a href="https://www.youtube.com/watch?v=H18s_-_CpmU&amp;amp;t=49s" target="_blank" rel="noopener">Configuring the cluster and the hyperv.safe modules</a> (1:59)</li>
<li><a href="https://www.youtube.com/watch?v=H18s_-_CpmU&amp;amp;t=168s" target="_blank" rel="noopener">Live testing: VM replication, migration, and automatic failover on crash</a> (2:26)</li>
</ol>
<h3 id="step-by-step-implementation">Step-by-Step Implementation</h3>
<ul>
<li><a href="/quick-install/safekit-quick-installation-guide-with-hyper-v/">Read the guide to set up a mirrored Hyper-V cluster on Windows.</a></li>
<li><a href="/quick-install/safekit-quick-installation-guide-with-kvm/">Read the guide to set up a mirrored KVM cluster on Linux.</a></li>
</ul>
<p>&amp;amp;amp;amp;amp;amp;lt;br /&amp;amp;amp;amp;amp;amp;gt;</p>
<h2 id="hub">🔍 SafeKit High Availability Navigation Hub</h2>
<p><strong>Explore SafeKit: Features, technical videos, documentation, and free trial</strong></p>
<table>
<thead>
<tr>
<th>Resource Type</th>
<th>Description</th>
<th>Direct Link</th>
</tr>
</thead>
<tbody>
<tr>
<td><strong>Key Features</strong></td>
<td>Why Choose SafeKit for Simple and Cost-Effective High Availability?</td>
<td><a href="/#why-choose-safekit-for-ha" title="Discover SafeKit features for simple and cost-effective high availability">See Why Choose SafeKit for High Availability</a></td>
</tr>
<tr>
<td><strong>Use Cases</strong></td>
<td>Explore How SafeKit Ensures the High Availability of Critical Infrastructure</td>
<td><a href="/#safekit-use-cases" title="Explore SafeKit high availability use cases">See All Use Cases (OEM Software, Edge Servers, SCADA, and more)</a></td>
</tr>
<tr>
<td><strong>Deployment Model</strong></td>
<td>All-in-One SANless HA: Shared-Nothing Software Clustering</td>
<td><a href="/#all-in-one-sanless-ha" title="Learn about all-in-one SANless high availability with shared-nothing software clustering">See SafeKit All-in-One SANless HA</a></td>
</tr>
<tr>
<td><strong>HA Strategies</strong></td>
<td>SafeKit: Infrastructure (VM) vs. Application-Level High Availability</td>
<td><a href="/#safekit-ha-redundancy-choices" title="Compare VM-level redundancy with SafeKit application-level high availability strategies">See SafeKit HA &amp; Redundancy: VM vs. Application Level</a></td>
</tr>
<tr>
<td><strong>Technical Specifications</strong></td>
<td>Technical Limitations for SafeKit Clustering</td>
<td><a href="/#safekit-ha-limitations" title="Technical requirements and limitations for SafeKit application clustering">See SafeKit High Availability Limitations</a></td>
</tr>
<tr>
<td><strong>Proof of Concept</strong></td>
<td>SafeKit: High Availability Configuration &amp; Failover Demos</td>
<td><a href="/#safekit-failover-tutorials" title="Step-by-step videos on SafeKit high availability, from installation to automated failover">See SafeKit Failover Tutorials</a></td>
</tr>
<tr>
<td><strong>Architecture</strong></td>
<td>How the SafeKit Mirror Cluster works (Real-Time Replication &amp; Failover)</td>
<td><a href="/#safekit-mirror-cluster" title="See technical architecture and failover mechanism of SafeKit Mirror Cluster">See SafeKit Mirror Cluster: Real-Time Replication &amp; Failover</a></td>
</tr>
<tr>
<td><strong>Architecture</strong></td>
<td>How the SafeKit Farm Cluster works (Network Load Balancing &amp; Failover)</td>
<td><a href="/#safekit-farm-cluster" title="Technical overview of SafeKit Farm Cluster architecture with network load balancing">See SafeKit Farm Cluster: Network Load Balancing &amp; Failover</a></td>
</tr>
<tr>
<td><strong>Competitive Advantages</strong></td>
<td>Comparison: SafeKit vs. Traditional High Availability (HA) Clusters</td>
<td><a href="/#safekit-ha-comparison" title="Detailed comparison of SafeKit software vs traditional hardware-based HA clusters">See SafeKit vs. Traditional HA Cluster Comparison</a></td>
</tr>
<tr>
<td><strong>Technical Resources</strong></td>
<td>SafeKit High Availability: Documentation, Downloads &amp; Trial</td>
<td><a href="/#safekit-ha-technical-resources" title="Access SafeKit free trial, technical documentation, and high availability white papers">See SafeKit HA Free Trial &amp; Technical Documentation</a></td>
</tr>
<tr>
<td><strong>Pre-configured Solutions</strong></td>
<td>SafeKit Application Module Library: Ready-to-Use HA Solutions</td>
<td><a href="/#safekit-ha-application-modules" title="Browse the library of pre-configured SafeKit modules for automated application failover">See SafeKit High Availability Application Modules</a></td>
</tr>
</tbody>
</table>
<div class="button-row">
  <a class="btn-action" href="https://safekit.eviden.com/contact-us-for-safekit/">🧑 Contact us</a>
  <a class="btn-action" href="/resources/safekit-free-trial/">🎁 SafeKit free trial</a>
  <a class="btn-action" href="https://training.my.evidian.com/mod/page/view.php?id=712">🏅 Free certification</a>
  <a class="btn-action" href="https://safekit.eviden.com/get-a-quote-safekit/">💰 Perpetual license cost</a>
</div>