---
title: "Old SafeKit Milestone Configuration"
description: "Be careful, some specific steps are required to configure on the virtual IP address else the failover is not working. 1. Launch the SafeKit console Launch the web console in a browser on one cluster node by connecting to http://localhost:9010. Enter admin as user name and the password defined during installation. You can also run […]"
canonical: "https://safekit.eviden.com/quick-install/safekit-quick-installation-guide-old-milestone-configuration/"
category: "quick-install"
lang: "en"
---

<div class="callout callout-warning"><img src="/wp-content/uploads/2022/07/warning-small.png" alt="Warning"><span>Be careful, some specific steps are required to configure on the virtual IP address else the failover is not working.</span></div>
<h3 id="1-launch-the-safekit-console">1. Launch the SafeKit console</h3>
<ul>
<li>Launch the web console in a browser on one cluster node by connecting to <code>http://localhost:9010</code>.</li>
<li>Enter <code>admin</code> as user name and the password defined during installation.</li>
</ul>
<p>You can also run the console in a browser on a workstation external to the cluster.</p>
<div class="callout callout-warning"><img src="/wp-content/uploads/2022/07/warning-small.png" alt="Warning"><span>The configuration of SafeKit is done on both nodes from a single browser.</span></div>
<div class="callout"><img src="/wp-content/uploads/2022/07/note.png" alt="Note"><span>To secure the web console, see Securing the SafeKit web console in the User's Guide.</span></div>
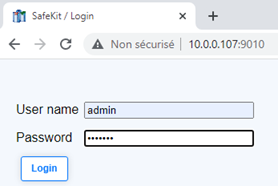
<img src="/wp-content/uploads/2023/01/appli-1.png" alt="Start the SafeKit web console to configure the  cluster">
<h3 id="2-configure-node-addresses">2. Configure node addresses</h3>
<ul>
<li>Enter the node IP addresses.</li>
<li>Then, click on <code>Apply</code> to save the configuration.</li>
</ul>
<div class="callout callout-warning"><img src="/wp-content/uploads/2022/07/warning-small.png" alt="Warning"><span>If node1 or node2 background color is red, check connectivity of the browser to both nodes and check firewall on both nodes for troubleshooting.</span></div>
<div class="callout"><img src="/wp-content/uploads/2022/07/note.png" alt="Note"><span>This operation will place the IP addresses in the `cluster.xml` file on both nodes (more information in the training with the command line).</span></div>
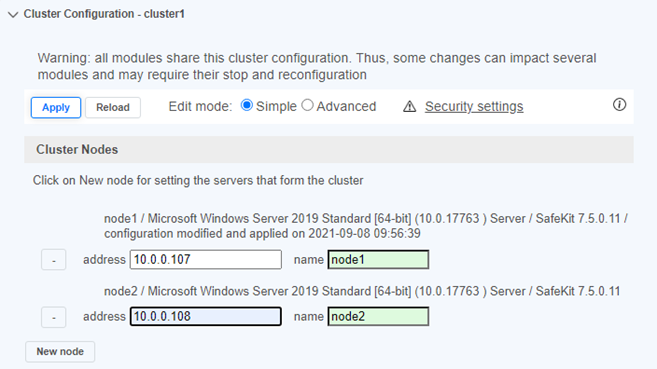
<img src="/wp-content/uploads/2023/01/appli-3.png" alt="Enter the nodes of the  cluster">
<h3 id="3-choose-the-module">3. Choose the module</h3>
<ul>
<li>In the Configuration tab, click on the .safe module.</li>
</ul>
<div class="callout"><img src="/wp-content/uploads/2022/07/note.png" alt="Note"><span>The console finds xxx.safe in the 'Application_Modules/demo/' directory on the server side if you dropped a module there during installation.</span></div>
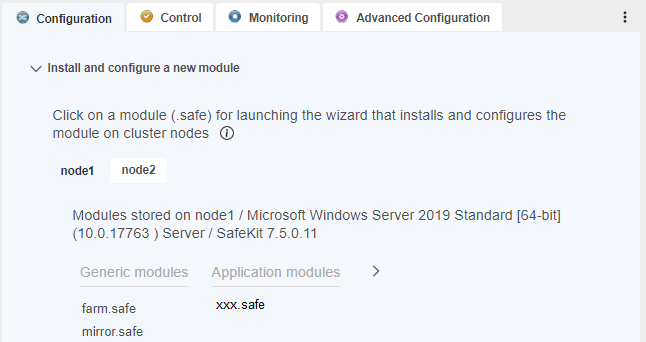
<img src="/wp-content/uploads/2023/01/appli-4.png" alt="Choose the module for ">
<h3 id="4-configure-the-module">4. Configure the module</h3>
<ul>
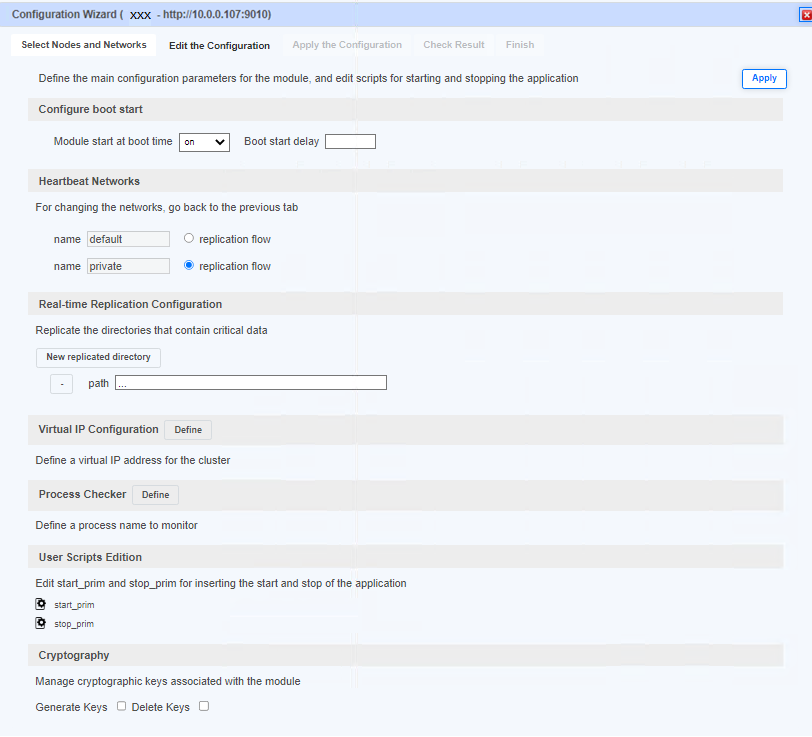
<li>Choose an automatic start of the module at boot without delay.</li>
<li>Normally, you have a single heartbeat network on which the replication is made. But, you can define a private network if necessary.</li>
<li>Check that the replicated directories are installed on both nodes and contain the application data.<br>
Replication of data and also logs is required for a database.<br>
You can add new replicated directories as needed.</li>
<li>Enter a virtual IP address. A virtual IP address is a standard IP address in the same IP network (same subnet) as the IP addresses of both nodes.<br>
Application clients must be configured with the virtual IP address (or the DNS name associated with the virtual IP address).<br>
The virtual IP address is automatically switched in the event of a failure.</li>
<li><code>start_prim</code> and <code>stop_prim</code> must contain starting and stopping of the application.<br>
You can add new services in these scripts.<br>
Check that the names of the services in these scripts are those installed on both nodes, otherwise modify them in the scripts.</li>
<li>Stop the services configured in <code>start_prim</code> on both nodes.</li>
<li>On Windows and on both nodes, with the Windows services manager, set <code>Boot Startup Type = Manual</code> for all the services registered in <code>start_prim</code> (SafeKit controls the start of services in <code>start_prim</code>).</li>
</ul>
<div class="callout callout-warning"><img src="/wp-content/uploads/2022/07/warning-small.png" alt="Warning"><span>If SQL is on the management server:</span></div>
<ul>
<li>The <a href="https://learn.microsoft.com/en-us/sql/relational-databases/databases/system-databases" target="_blank" rel="noopener">SQL system databases</a> (like master.mdf and mastlog.ldf) must be located in the same directories on both nodes. The directories must be configured as replicated.</li>
<li>SQL must be also installed at the same location in the file system on both nodes because the read-only <a href="https://learn.microsoft.com/en-us/sql/relational-databases/databases/resource-database" target="_blank" rel="noopener">SQL resource database</a> is located in the binary and is required for the failover. This database does not need to be replicated.</li>
<li>The SQL Milestone databases (.mdf and .ldf) must be located in the same directories on both nodes. The directories must be configured as replicated. Milestone databases are as follows according this <a href="https://doc.milestonesys.com/en-US/bundle/doc1040_2026r1/page/content/standard_features/sf_mc/sf_maintenance/mc_managingthesqlserver.htm" target="_blank" rel="noopener">article</a>.</li>
</ul>
<div class="callout callout-warning"><img src="/wp-content/uploads/2022/07/warning-small.png" alt="Warning"><span>Note that if a process name is displayed in Process Checker, it will be monitored with a restart action in case of failure. Configuring a wrong process name will cause the module to stop right after its start.</span></div>
<div class="callout"><img src="/wp-content/uploads/2022/07/note.png" alt="Note"><span>The "Apply" button will report the configuration in the `userconfig.xml`, `start_prim`, `stop_prim` files on both nodes (more information in the training with the command line).</span></div>
<img src="/wp-content/uploads/2023/01/appli-7-1.png" alt="Enter the  module settings">
<h3 id="5-verify-successful-configuration">5. Verify successful configuration</h3>
<ul>
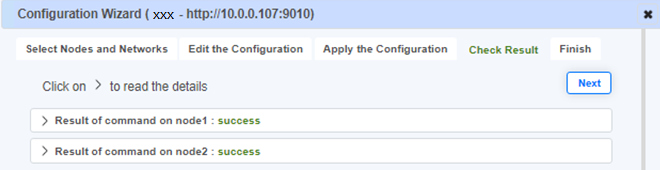
<li>Check the success message (green) on both nodes and click Next.</li>
</ul>
<img src="/wp-content/uploads/2023/01/appli-9-2.png" alt="Check the  module configuration success">
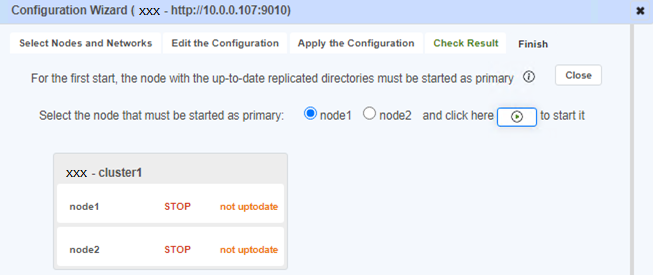
<h3 id="6-do-not-start-anything-and-click-on-the-close-button">6. Do not start anything and click on the Close button</h3>
<div class="callout callout-warning"><img src="/wp-content/uploads/2022/07/warning-small.png" alt="Warning"><span>Do not start anything and click on the Close button because special configuration is required on the virtual IP address before starting</span></div>
<img src="/wp-content/uploads/2023/01/appli-10-1.png" alt="Select the  node with the up-to-date data">
<h3 id="milestone-files">7. Go to desktop of node 1 and set the virtual IP address in internal Milestone files</h3>
<div class="callout"><img src="/wp-content/uploads/2022/07/note.png" alt="Note"><span>Since Milestone 2022 R3, this step is not useful and will be made automatically with "Server Configurator - Registering servers - http://virtual-IP" in a next step.</span></div>
<p>In a Powershell command line as Administrator, execute on node 1 this script:</p>
<pre><code>c:/safekit/modules//bin/UpdateAuthServerUri.ps1
</code></pre>
<img src="/wp-content/uploads/2022/07/note.png" alt="Note">
<p>This script sets the virtual IP address in 2 internal Milestone files:</p>
<pre><code>C:\ProgramData\Milestone\XProtect Management Server\ServerConfig.xml


    &lt;AuthorizationServerUri&gt;http://**&lt; virtual-ip&gt;**/IDP&lt;/AuthorizationServerUri&gt;


C:\Program Files\Milestone\XProtect Management Server\IIS\IDP\appsettings.json


    &quot;Authority&quot;: &quot;http://**&lt; virtual-ip&gt;**/IDP&quot;
</code></pre>
<div class="callout callout-warning"><img src="/wp-content/uploads/2022/07/warning-small.png" alt="Warning"><span>We assume at this step that the virtual IP address has been correctly configured in the previous steps (the script uses the virtual IP address entered in the SafeKit console and stored in `userconfig.xml`).</span></div>
<div class="callout"><img src="/wp-content/uploads/2022/07/note.png" alt="Note"><span>### 8. Start node 1 as primary in the console, the node with up-to-date data</span></div>
<p>We assume since Step 7 that node 1 has the up-to-date replicated directories.</p>
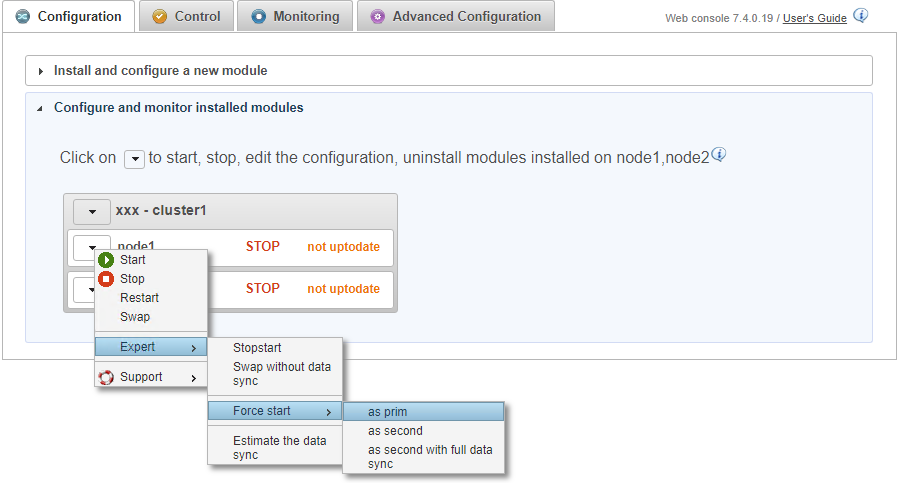
<p>Force the start of node 1 as primary. When node 2 will be started, all data from node 1 will be copied to node 2.</p>
<div class="callout callout-warning"><img src="/wp-content/uploads/2022/07/warning-small.png" alt="Warning"><span>If you make the wrong choice, you run the risk of synchronizing outdated data on both nodes.</span></div>
<div class="callout callout-warning"><img src="/wp-content/uploads/2022/07/warning-small.png" alt="Warning"><span>It is also assumed that the application is stopped on node 1 so that SafeKit installs the replication mechanisms and then starts the application in the `start_prim` script.</span></div>
<img src="/wp-content/uploads/2022/07/appli-11-bis.png" alt="Force the start as primary of the  node with the up-to-date data">
<h3 id="9-wait-for-the-transition-to-alone-green">9. Wait for the transition to ALONE (green)</h3>
<ul>
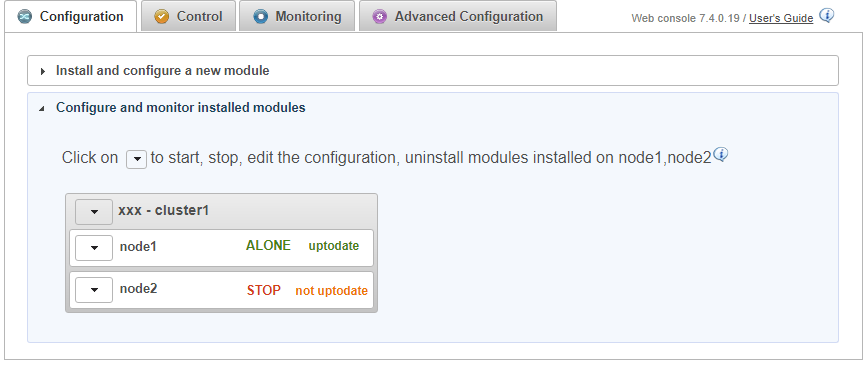
<li>Node 1 should reach the ALONE (green) state, which means that the <code>start_prim</code> script has been executed on node 1.</li>
</ul>
<div class="callout callout-warning"><img src="/wp-content/uploads/2022/07/warning-small.png" alt="Warning"><span>If the status is ALONE (green) and the application is not started, check output messages of `start_prim` in the Application Log of node 1.</span></div>
<div class="callout callout-warning"><img src="/wp-content/uploads/2022/07/warning-small.png" alt="Warning"><span>If node 1 does not reach ALONE (green) state, analyze why with the Module Log of node 1.</span></div>
<div class="callout callout-warning"><img src="/wp-content/uploads/2022/07/warning-small.png" alt="Warning"><span>If the cluster is in `WAIT (red) not uptodate - STOP (red) not uptodate` state, stop the WAIT node and force its start as primary.</span></div>
<img src="/wp-content/uploads/2022/07/appli-11-bis-bis.png" alt="The first  node starts as primary and becomes ALONE">
<h3 id="10-in-the-desktop-of-node-1-stop-then-register-on-the-vitual-ip-address-and-restart-the-milestone-management-server">10. In the desktop of node 1, stop, then register on the vitual IP address and restart the Milestone Management Server</h3>
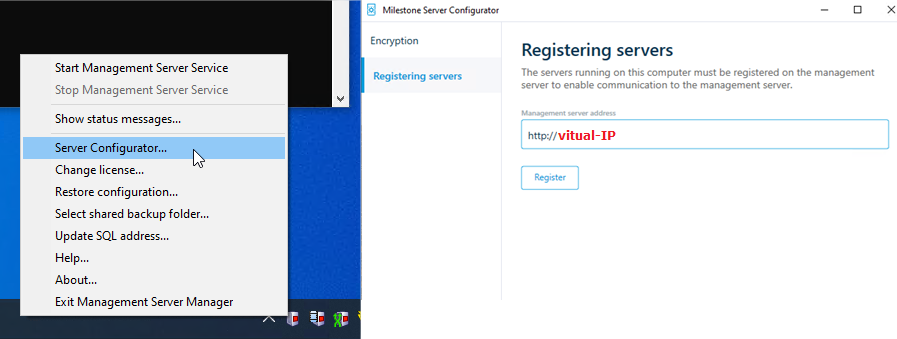
<p>Execute the following bullets on node 1 according the menu in the image:</p>
<ul>
<li>Right-click on the <strong>Milestone Management Server</strong> icon in the taskbar.</li>
<li><strong>Stop Management Server Service</strong></li>
<li>Then choose <strong>Server Configurator&hellip;</strong> and register the virtual IP address.</li>
<li><strong>Start Management Server Service</strong></li>
</ul>
<div class="callout"><img src="/wp-content/uploads/2022/07/note.png" alt="Note"><span>This procedure registers the node 1 management server in the SQL database (running on node 1) through a connection to the virtual address.</span></div>
<div class="callout callout-warning"><img src="/wp-content/uploads/2022/07/warning-small.png" alt="Warning"><span>Before Milestone 2022 R3 version, the registration may have deleted the virtual IP address configuration in the internal Milestone files. In this case, repeat <a href="#milestone-files">Step 7</a>.</span></div>
<div class="callout"><img src="/wp-content/uploads/2022/07/note.png" alt="Note"><span>Note: To register a version before Milestone 2020 R2, use **Change encryption settings...**</span></div>
<img src="/wp-content/uploads/2022/07/milestone-management-server-register-2020.png" alt="Register the management server in Milestone 2020+">
<h3 id="11-in-the-desktop-of-node-1-with-milestone-management-client-set-the-virtual-ip-address-in-urls-for-services-and-network">11. In the desktop of node 1 with Milestone Management Client, set the virtual IP address in URLs for services and network</h3>
<div class="callout"><img src="/wp-content/uploads/2022/07/note.png" alt="Note"><span>Since Milestone 2022 R3, this step is not useful and has been made automatically with "Server Configurator - Registering servers - http://virtual-IP".</span></div>
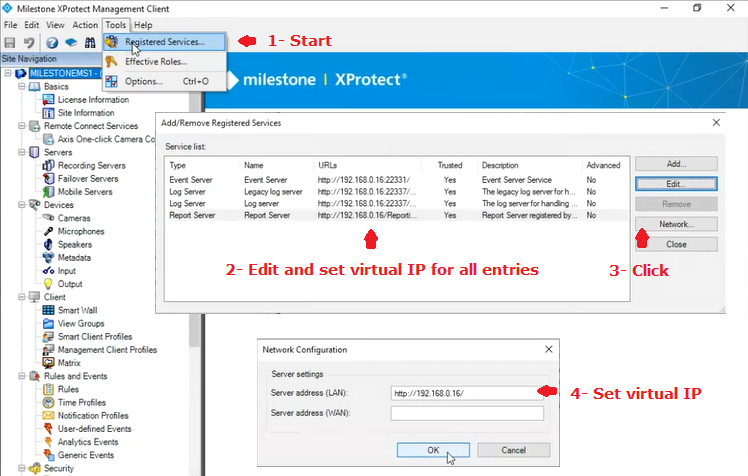
<p>According the image:</p>
<ol>
<li>Start <strong>Milestone XProtect Management Client</strong> on node 1.</li>
<li>In the <strong>Tools</strong> menu, select <strong>Registered Services</strong>.
<ul>
<li>In the <strong>Add/Remove Registered Services</strong> window, select a service in the list and click on <strong>Edit</strong>.</li>
<li>In the <strong>Edit Registered Service</strong> window, change the URL address of the service with the same URL address but containing the virtual IP address.</li>
<li>Repeat these steps for all services listed in the window.</li>
</ul>
</li>
<li>In the same window, click on <strong>Network</strong>.
<ul>
<li>In the <strong>Network Configuration</strong> window, change the URL address of the server with the same URL address but containing the virtual IP address.</li>
</ul>
</li>
</ol>
<img src="/wp-content/uploads/2022/07/milestone-url-vip.png" alt="Set the virtual IP address in the URLs and in the Milestone Management Client">
<h3 id="role">12. In the desktop of node 1 with Milestone Management Client, set the administrator roles to ensure a correct failover</h3>
<div class="callout"><img src="/wp-content/uploads/2022/07/note.png" alt="Note"><span>If Milestone "Windows authentication" has been configured with an Active Directory, the user/password will be retrieved in the external AD on the secondary node after a failover, so there is no special configuration.</span></div>
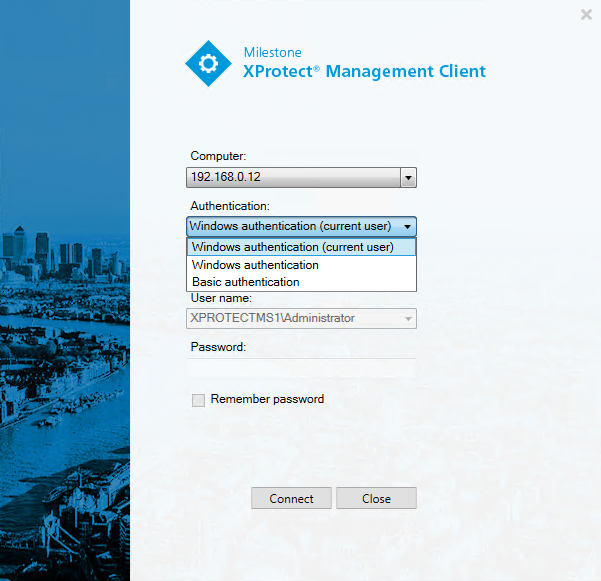
<p>When you start the Milestone XProtect Management Client, you have to authenticate either with &ldquo;Windows authentication&rdquo; or &ldquo;Basic authentication&rdquo; (<a href="/wp-content/uploads/2022/07/milestone-management-server-connect.png">click here to see the screenshot</a>).</p>
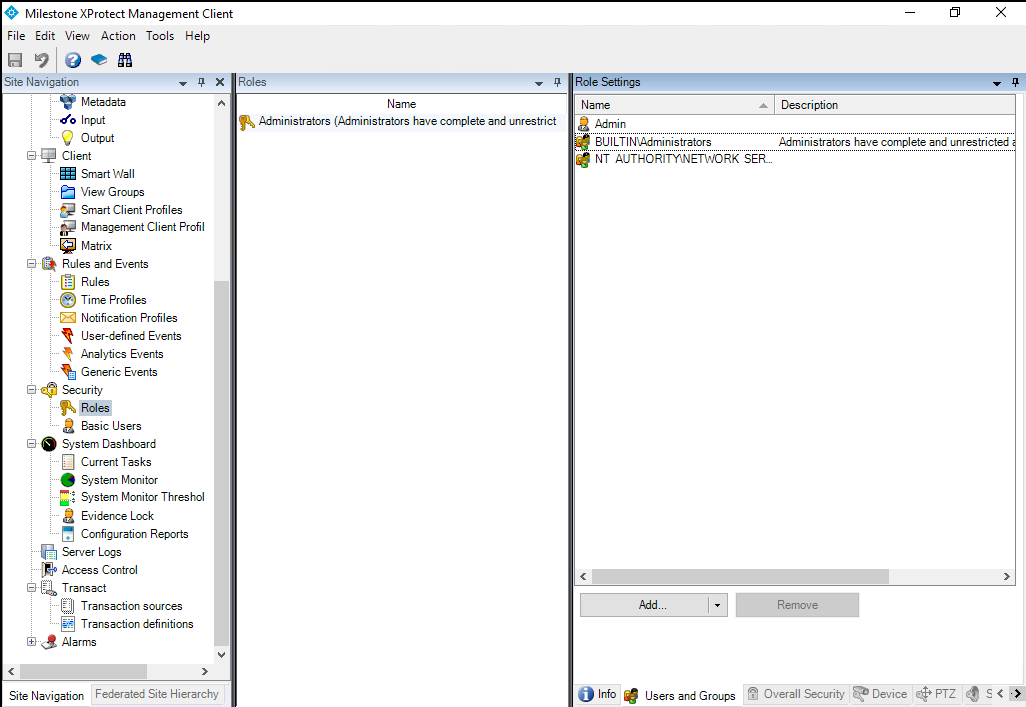
<p>Open <strong>Milestone XProtect Management Client</strong> and in <strong>Security / Roles</strong> (see image)</p>
<ul>
<li>Set the Windows group <strong>BUILTIN\Administrators</strong> . Thus an administrator user on the secondary will be able to connect to Milestone on the secondary with &ldquo;Windows authentication&rdquo;.</li>
<li>Create a user with a &ldquo;Basic authentication&rdquo; (<strong>Admin</strong> in the image) to be sure to re-authenticate on the secondary node after a failover. For &ldquo;Basic authentication&rdquo;, the user/password is stored in the SQL database and will be retrieved on the secondary node after a failover.</li>
</ul>
<div class="callout callout-warning"><img src="/wp-content/uploads/2022/07/warning-small.png" alt="Warning"><span>By setting the BUILTINAdministrators group, you will be able to authenticate on the seconday node with a local Windows administrator.</span></div>
<p>Else no authentication will be possibe with a local Windows account on the secondary after a failover.</p>
<p>It&rsquo;s because the BUILTIN\Administrators group has the same SID on both nodes. For other local groups or local users, authentication will not be possible on the secondary because SIDs are different between both nodes even if they have the same name.</p>
<img src="/wp-content/uploads/2022/07/milestone-management-server-roles.png" alt="Set roles in the Milestone Management Client">
<h3 id="milestone-files-2">13. Go to the desktop of node 2 and set the virtual IP address in internal Milestone files</h3>
<div class="callout"><img src="/wp-content/uploads/2022/07/note.png" alt="Note"><span>Since Milestone 2022 R3, this step is not useful and will be made automatically with "Server Configurator - Registering servers - http://virtual-IP" in a next step.</span></div>
<p>In a Powershell command line as Administrator, execute on node 2 this script:</p>
<pre><code>c:/safekit/modules/milestone/bin/UpdateAuthServerUri.ps1
</code></pre>
<img src="/wp-content/uploads/2022/07/note.png" alt="Note">
<p>This script sets the virtual IP address in 2 internal Milestone files:</p>
<pre><code>C:\ProgramData\Milestone\XProtect Management Server\ServerConfig.xml


    &lt;AuthorizationServerUri&gt;http://**&lt; virtual-ip&gt;**/IDP&lt;/AuthorizationServerUri&gt;


C:\Program Files\Milestone\XProtect Management Server\IIS\IDP\appsettings.json


    &quot;Authority&quot;: &quot;http://**&lt; virtual-ip&gt;**/IDP&quot;
</code></pre>
<h3 id="14-in-the-desktop-of-node-2-register-the-management-server-on-the-vitual-ip-address">14. In the desktop of node 2, register the management server on the vitual IP address</h3>
<ul>
<li>Choose <strong>Server Configurator</strong> in the taskbar of node 2 and register it on the virtual IP address (see image).</li>
<li>Then <strong>Stop Management Server Service</strong>.</li>
</ul>
<div class="callout callout-warning"><img src="/wp-content/uploads/2022/07/warning-small.png" alt="Warning"><span>The account of the user executing the registration on node 2 must have the administrator role in Milestone on node 1.</span></div>
<p>If it is the local administrator on node 2 who makes the registration, the built-in Windows group <code>BUILTIN\Administrators</code> must have been set in Management Client / Security / Roles at <a href="#role">Step 12</a>. Else the registration will not work.</p>
<div class="callout"><img src="/wp-content/uploads/2022/07/note.png" alt="Note"><span>This procedure registers the node 2 management server in the SQL database (running on node 1) through a connection to the virtual address.</span></div>
<div class="callout callout-warning"><img src="/wp-content/uploads/2022/07/warning-small.png" alt="Warning"><span>With a version of Milestone before 2022 R3, the registration may have deleted the virtual IP address configuration in the internal Milestone files. In this case, repeat <a href="#milestone-files-2">Step 13</a>.</span></div>
<img src="/wp-content/uploads/2022/07/milestone-management-server-register-2020.png" alt="Register the management server with Milestone 2020+">
<h3 id="15-start-node-2">15. Start node 2</h3>
<ul>
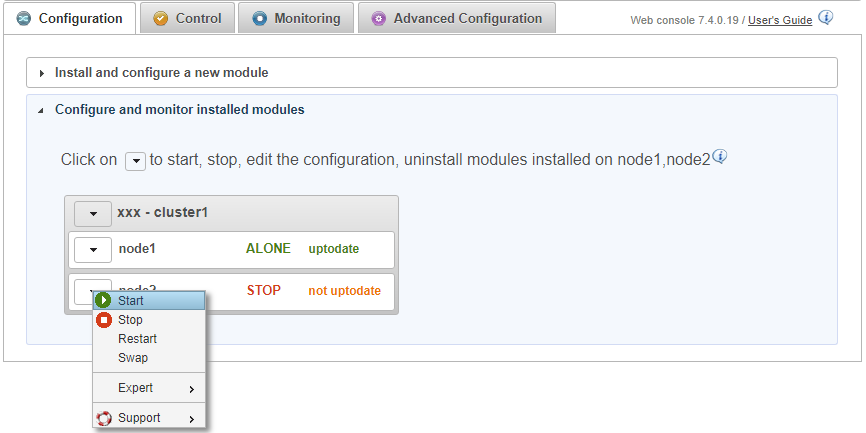
<li>Start node 2 with its contextual menu.</li>
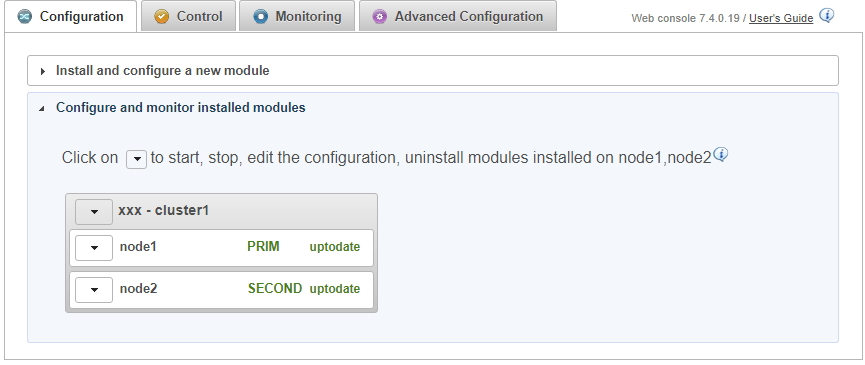
<li>Wait for the SECOND (green) state.</li>
</ul>
<div class="callout"><img src="/wp-content/uploads/2022/07/note.png" alt="Note"><span>Node 2 stays in the SECOND (magenta) state while resynchronizing the replicated directories (copy from node 1 to node 2).</span></div>
<p>This may take a while depending on the size of files to resynchronize in replicated directories and the network bandwidth.</p>
<p>To see the progress of the copy, see the Module Log of node 2 with the verbose option without forgetting to refresh the window.</p>
<img src="/wp-content/uploads/2022/07/appli-11.png" alt="The first  node starts as primary and becomes ALONE">
<h3 id="16-verify-that-the-cluster-is-operational">16. Verify that the cluster is operational</h3>
<ul>
<li>Check that the cluster is green/green with services running on the PRIM node and not running on the SECOND node.</li>
</ul>
<p>Only changes inside files are replicated in real time in this state.</p>
<div class="callout callout-warning"><img src="/wp-content/uploads/2022/07/warning-small.png" alt="Warning"><span>Components that are clients of services must be configured with the virtual IP address. The configuration can be done with a DNS name (if a DNS name has been created and associated with the virtual IP address).</span></div>
<img src="/wp-content/uploads/2022/07/appli-12.png" alt="The second  node starts as SECOND">
<h3 id="17-configure-the-virtual-ip-address-in-recording-servers">17. Configure the virtual IP address in recording servers</h3>
<ul>
<li>
<p>Either install the recording servers, specifying the virtual IP address in the installation URL.</p>
</li>
<li>
<p>Or, on the recording servers side, set the virtual IP address in the following fields of</p>
<pre><code>C:\ProgramData\Milestone\XProtect Recording Server\RecorderConfig.xml

    &lt;server&gt;&lt;address&gt;

    &lt;server&gt;&lt;authorizationserveraddress&gt;
</code></pre>
</li>
<li>
<p>Connect the Milestone Management Client and the Milestone Smart Client on the virtual IP address.</p>
</li>
</ul>
<h3 id="18-management-client-and-smart-client-are-not-functioning-properly-after-node-switch">18. Management Client and Smart Client are not functioning properly after node switch</h3>
<p>In a clustered XProtect® Management Server setup, Smart Client and Management Client show various issues after a node switch. The issue is related to tokens being generated on different nodes before and after the node switch, and to problems accessing certain certificates needed for token validation. A solution is available (for versions 2022 R3 to 2023 R2, see Milestone KB).</p>
<p>The issue is solved in Milestone 2023 R3.</p>
<h3 id="18-testing">18. Testing</h3>
<ul>
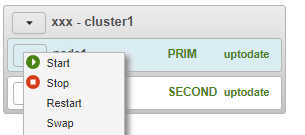
<li>Stop the PRIM node by scrolling down its contextual menu and clicking Stop. <strong>Do not use swap for a first test</strong> (see why below).</li>
<li>Verify that there is a failover on the SECOND node which should become ALONE (green).</li>
<li>And with Microsoft Management Console (MMC), check the failover of services (stopped on node 1 in the <code>stop_prim</code> script and started on node 2 in the <code>start_prim</code> script).</li>
</ul>
<div class="callout callout-warning"><img src="/wp-content/uploads/2022/07/warning-small.png" alt="Warning"><span>If your system is PRIM-SECOND and everything is functioning properly, perform a stop on the PRIM and verify that everything is working correctly on node2, which becomes ALONE.If everything is okay, initiate a start on node1, which will resynchronize the replicated directories from node2.</span></div>
<p>If things go wrong, stop node2 and force the start as primary of node1, which will restart with its locally healthy data at the time of the stop.</p>
<p>The swap involves a stop-start of the PRIM, which will resynchronize the data from node2 immediately after its stop, leaving no chance for a restart on healthy data if there is a replication configuration issue.</p>
<div class="callout callout-warning"><img src="/wp-content/uploads/2022/07/warning-small.png" alt="Warning"><span>If the application is not started on node 2 while the state is ALONE (green), check output messages of the `start_prim` script in the Application Log of node 2.</span></div>
<div class="callout callout-warning"><img src="/wp-content/uploads/2022/07/warning-small.png" alt="Warning"><span>If ALONE (green) is not reached, analyze why with the Module Log of node 2.</span></div>
<div class="callout"><img src="/wp-content/uploads/2022/07/note.png" alt="Note"><span>More information on tests in the User's Guide</span></div>
<img src="/wp-content/uploads/2022/07/appli-19.png" alt="Stop the  module on the PRIM server">